|
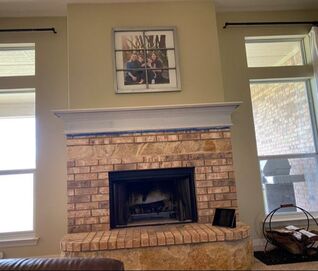
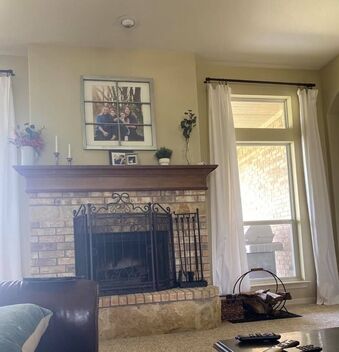
I've got an open concept layout and after updating our kitchen, the adjacent living room fireplace stuck out terribly. The mantle was the same color as the old kitchen cabinets (brown oak). My neighbor, Lesley Lockhart, is the owner and creative designer at Artfully TLC. She turned me onto Miss Lillian's NO WAX Chock Paint. I was inspired by her fireplace update (see HERE) and how quick/easy it was. So, I decided to just go ahead and paint our mantle place. STEPS:
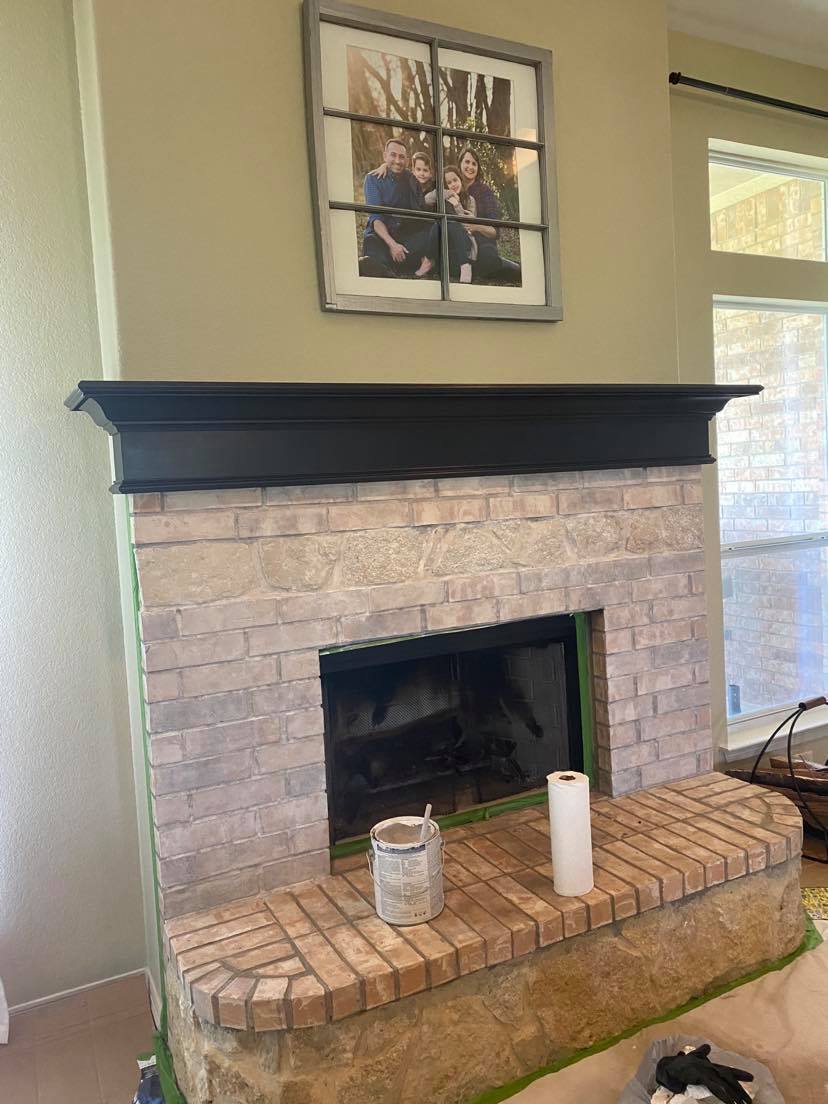
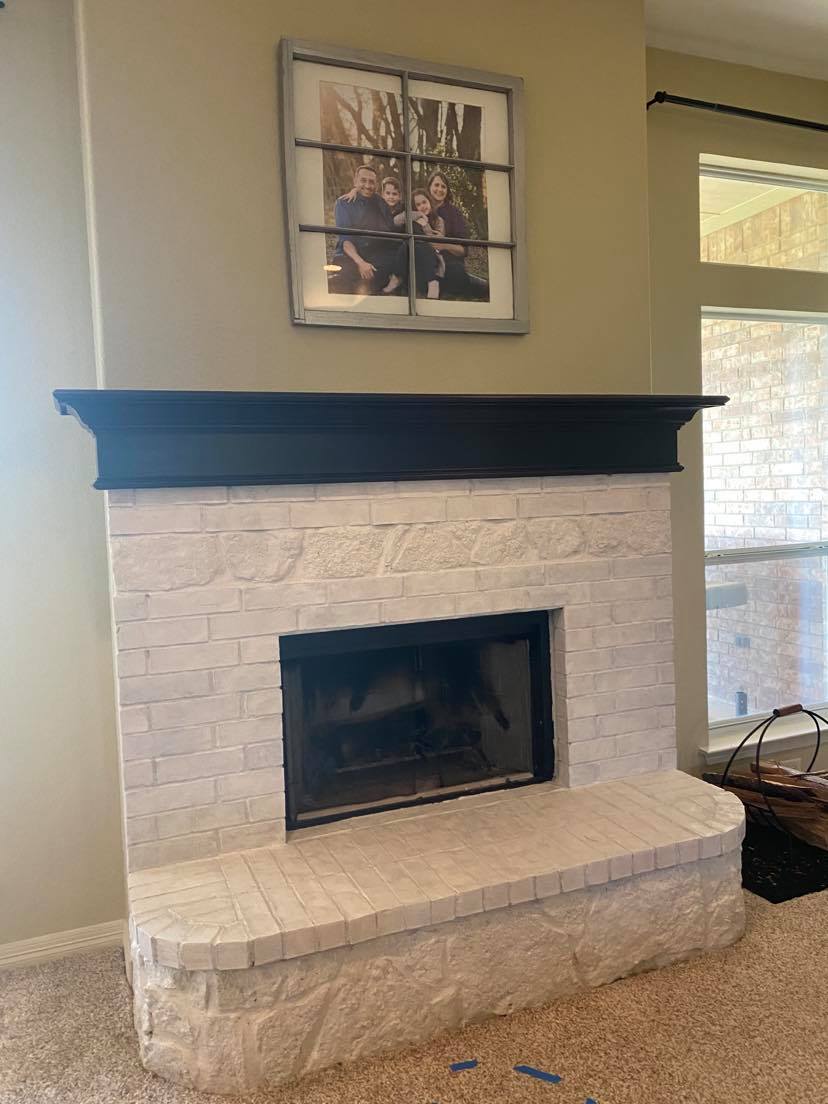
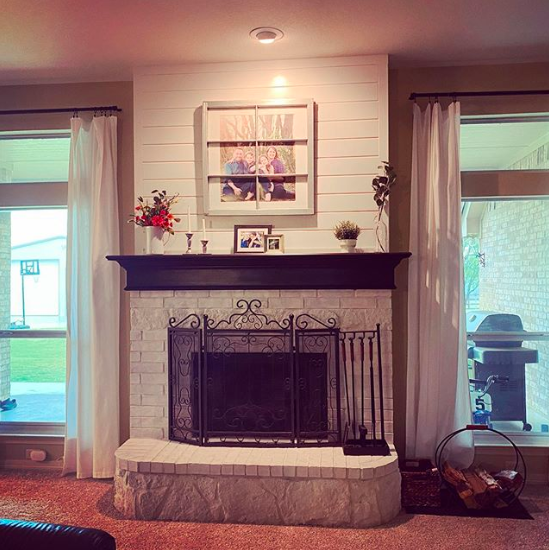
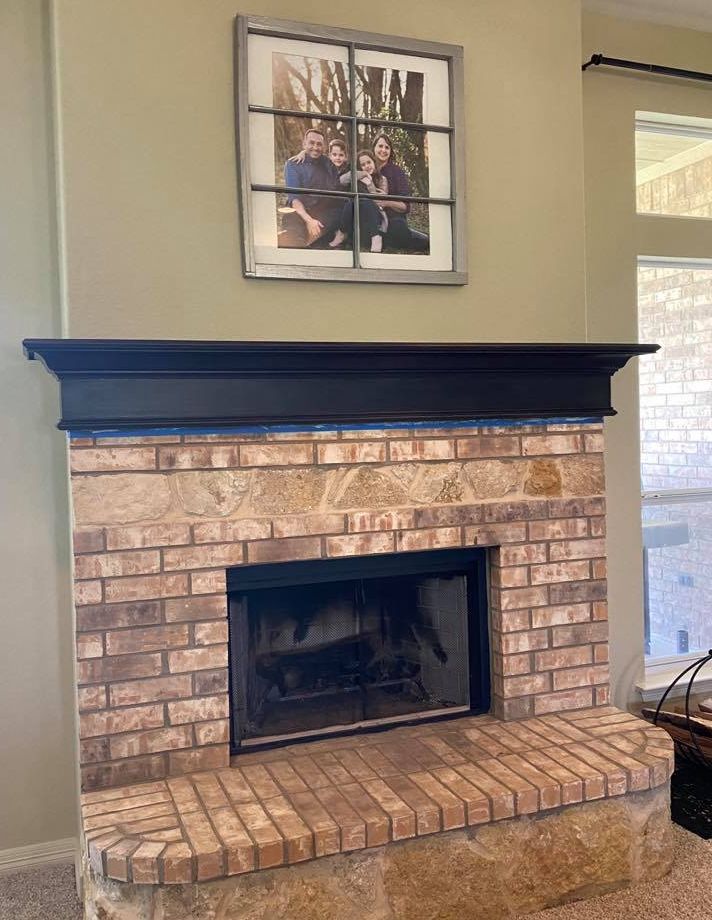 Next I painted the mantle with Miss Lillian's Industrial Chock Paint. I loved the color, but I wasn't yet satisfied. It didn't feel done. It just wasn't enough! I've never been a fan of the color of this brick so after thinking it over I decided to whitewash it. The following steps are... 1. I started by cleaning the fireplace bricks using Rust-Oleum's cleaner and degreaser before taping it off and putting a tarp on the floor. 2. To make the whitewash, I used the same white as our kitchen cabinets, Benjamin Moore Chantilly Lace OC-65. It's an oil-based paint, so I added mineral spirits to thin it for the whitewashing (50/50 mix). 3. Whitewashing was pretty darn easy. I just applied the paint on using a paint brush, being careful not to drop. I started with a thin layer, wasn't satisfied with the pinkish color (see picture on the left) and applied a second thin coat (see picture on the right). It was nice and looked a little better, and yet... still not complete or good enough. I wasn't satisfied. I wasn't done yet.
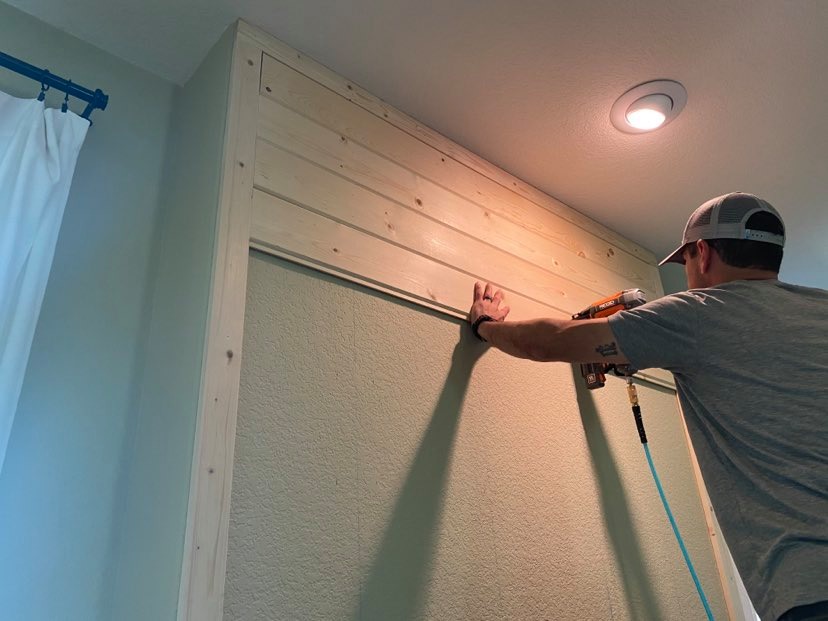
We've been in this house 6 months and we haven't gotten around to painting the walls yet. I'm not a fan of the beigy/taupe color. I think it really hurt the look of this fireplace with white on the bottom and brown on top. It took a few days, but I talked the husband into putting a wall of shiplap above the fireplace! If you'd like to do something similar, rest assured this was only about a half day project. We went to home depot and bought five 1" x 6" x 12' Barn Wood Shiplap Pine Boards for $8 each ($40 total) and two 1" x 2" x 12' pieces of trim for the frame ($8). My husband cut all the pieces to the width of the fireplace wall. Then, he used his laser stud finder and line chalk to mark where the studs are (very important and helpful step when securing the boards!). Starting with the outside frame, he applied construction adhesive before putting them in place on the wall and using his air compressor and nail gun to secure to the wall. We filled the nail holes with wood filler and sanded lightly.
Now we're getting somewhere... 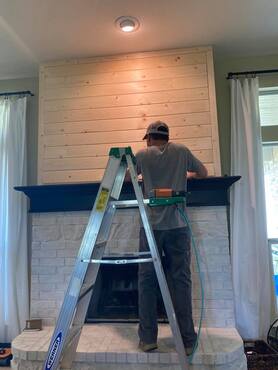 The very last and easiest step was to paint the shiplap in the same white as the fireplace brick and kitchen cabinets (not the whitewashed mixture with mineral spirits, but solid Benjamin Moore Chantilly Lace OC-65). I let it all dry and cure for a few days before styling it and... pure statement piece wonder!!!!  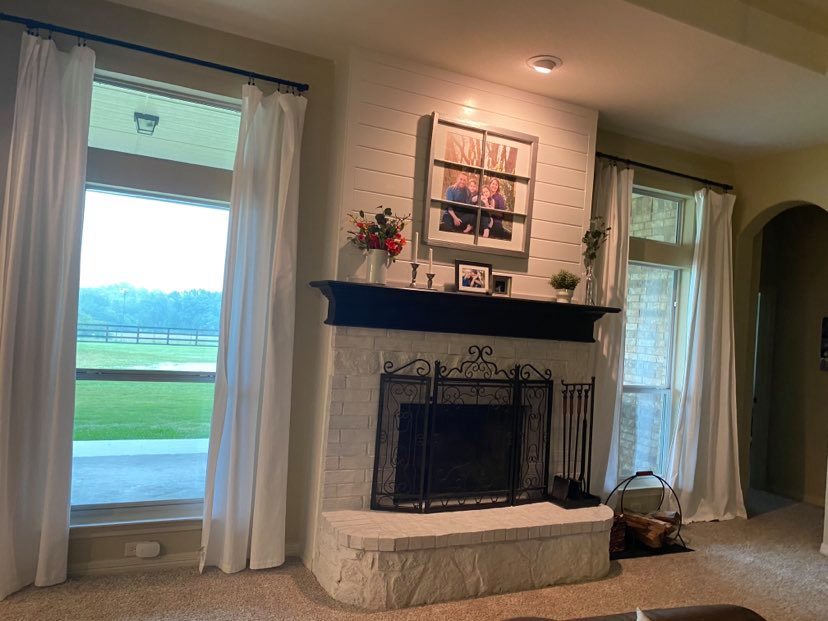 When you enter our house, the fireplace is in direct line of sight. I'm thrilled with the resulting grandeur and sophistication this brings to the living room and our entryway.
4 Comments
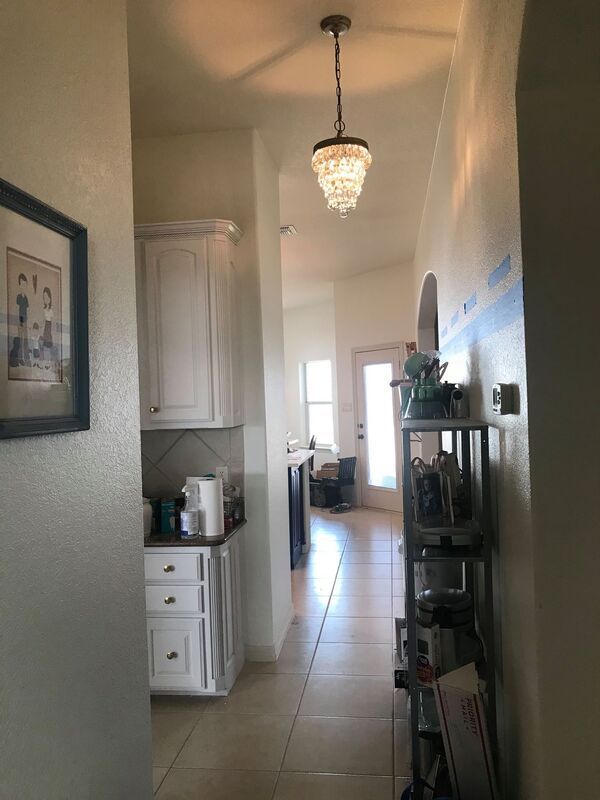
When you enter our new house from the garage, you're faced the laundry room to your left, cabinets and countertop in front, and to your right a large white blank wall. It was very utilitarian and uninspiring. I'm right-brained and my visual surroundings tend to have a strong influence on my mood/emotions- so this really bothered me and just wasn't going to work. First, as part of the kitchen renovation, I had the contractors paint these cabinets in Benjamin Moore Chantilly Lace OC-65, the same white as the kitchen cabinets. I like to keep the shades of colors in my house to only a few. I also changed out the light with a Pottery Barn Clarissa chandelier in small (to match the same, but larger chandeliers in the kitchen).
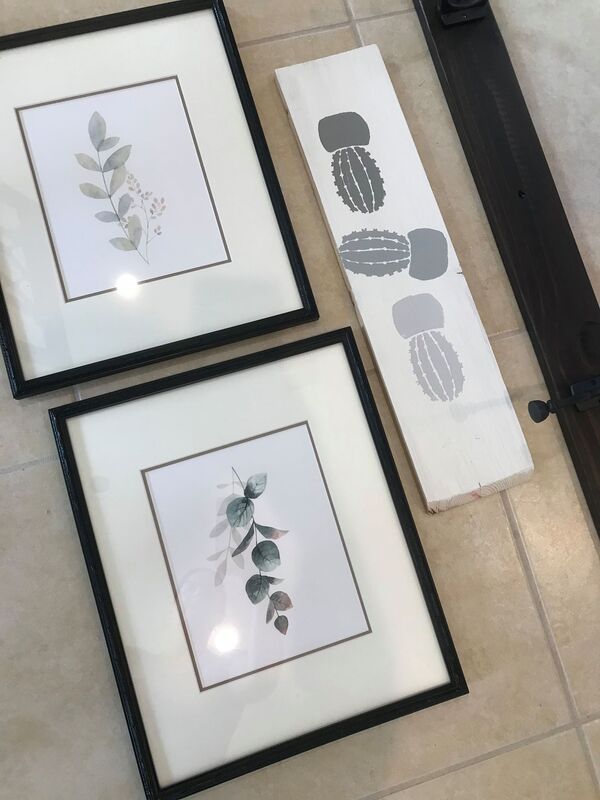
I took several steps to update this big blank wall. I laid out where I'd like to put some artwork and a coat hook board that runs the length of the wall.  I bought a large length of 2x4" and Restoration hardware Duluth hooks to match the hardware in the Kitchen, but in oil rubbed bronze. Then I took four picture frames that we already had, but they were white. So spray painted them, bought new mattes from Hobby Lobby and some botanical prints from Amazon.
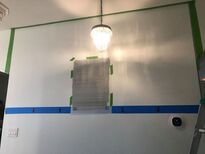
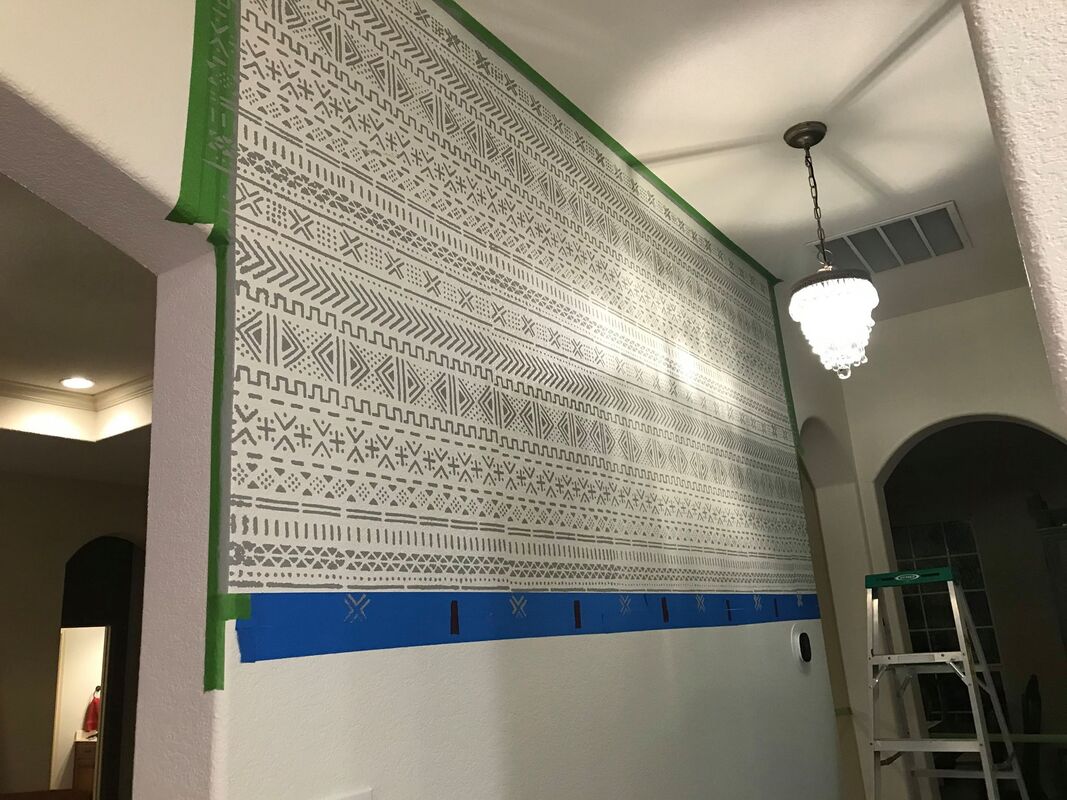
Then I picked out a stencil that I wanted to put on the top half of the wall. I chose an African Mudcloth wall stencil from CuttingEdge Stencil--the same place I bought the stencil pattern for my fireplace & patio floor tile stencil project and also for my laundry room accent wall project (in my last house). I bought a gray paint to match the gray in the kitchen counters to coordinate the spaces and got to work stenciling!
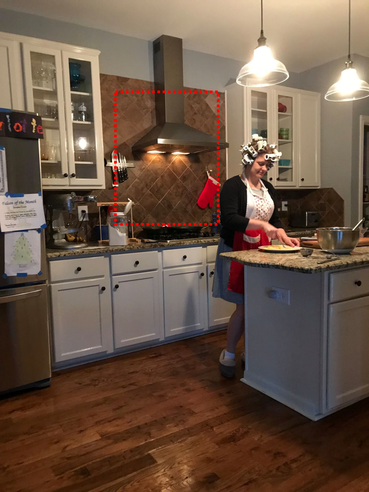
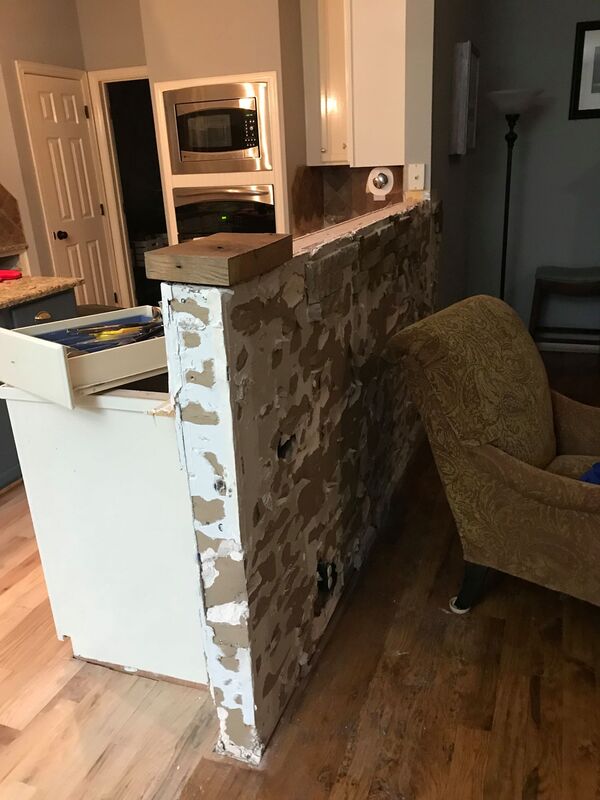
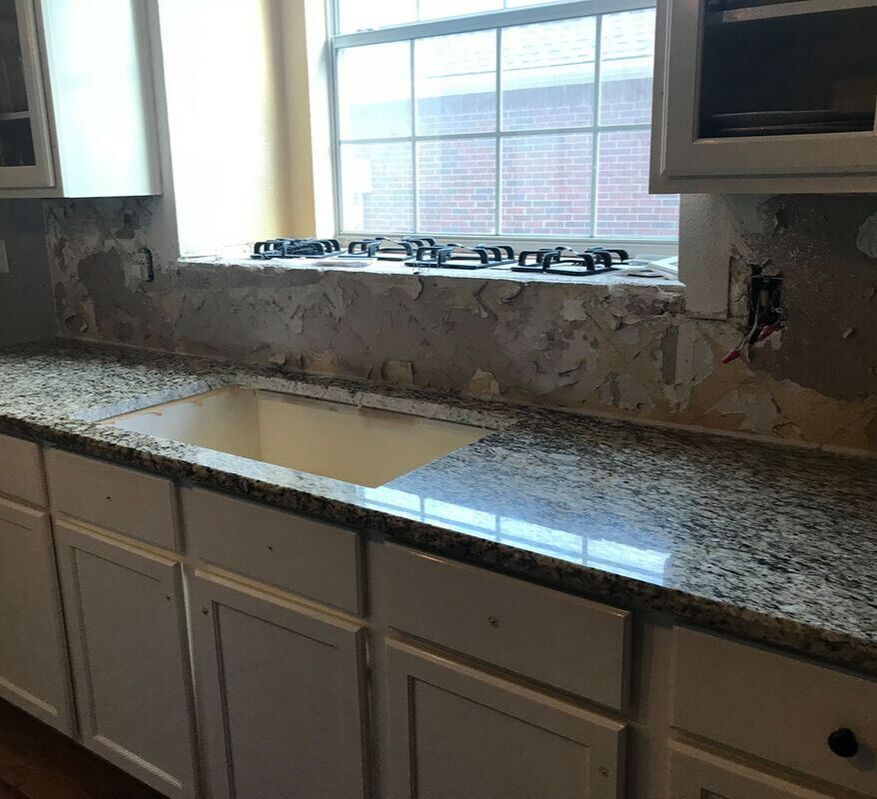
Then I screwed the wood coat rack to the wall (using a stud locator, be sure to drill into studs) and hung the pictures. Then I styled it by adding a cute hanging basket of faux lavender, a Persian rug that I've had forever (I bought it in Bahrain when I was in the Navy), hung some family pictures, and added a bench that I had laying around. It used to be at our kitchen table for years until we switched it out for new chairs (see the reupholster blog about those HERE). And voila- my one-day project was completed and my entryway looks a million times better! 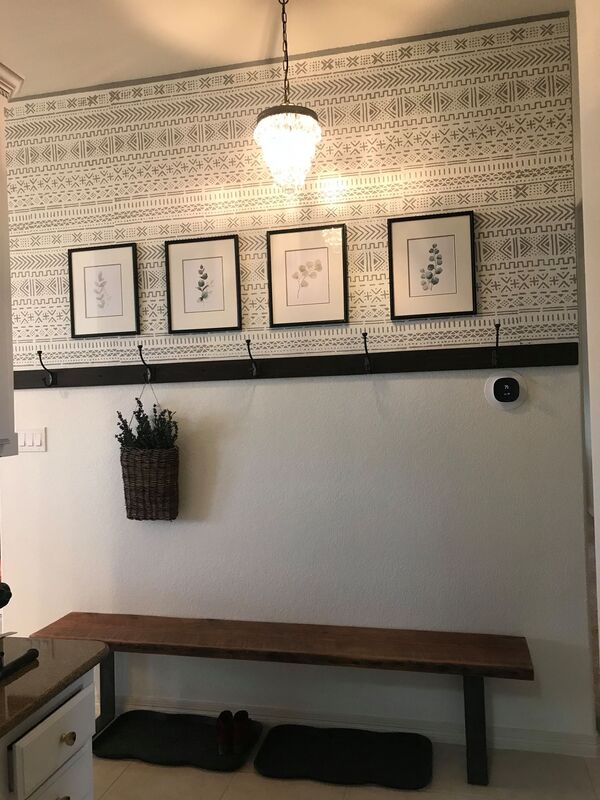 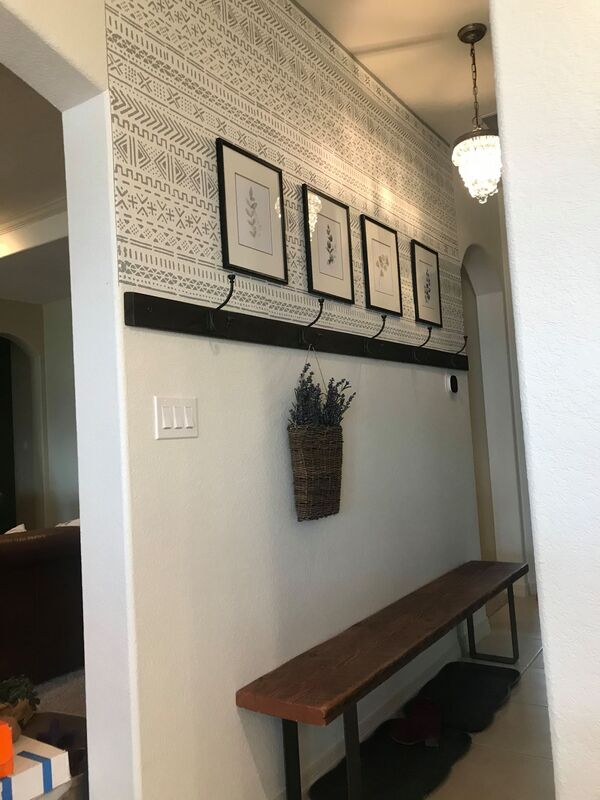 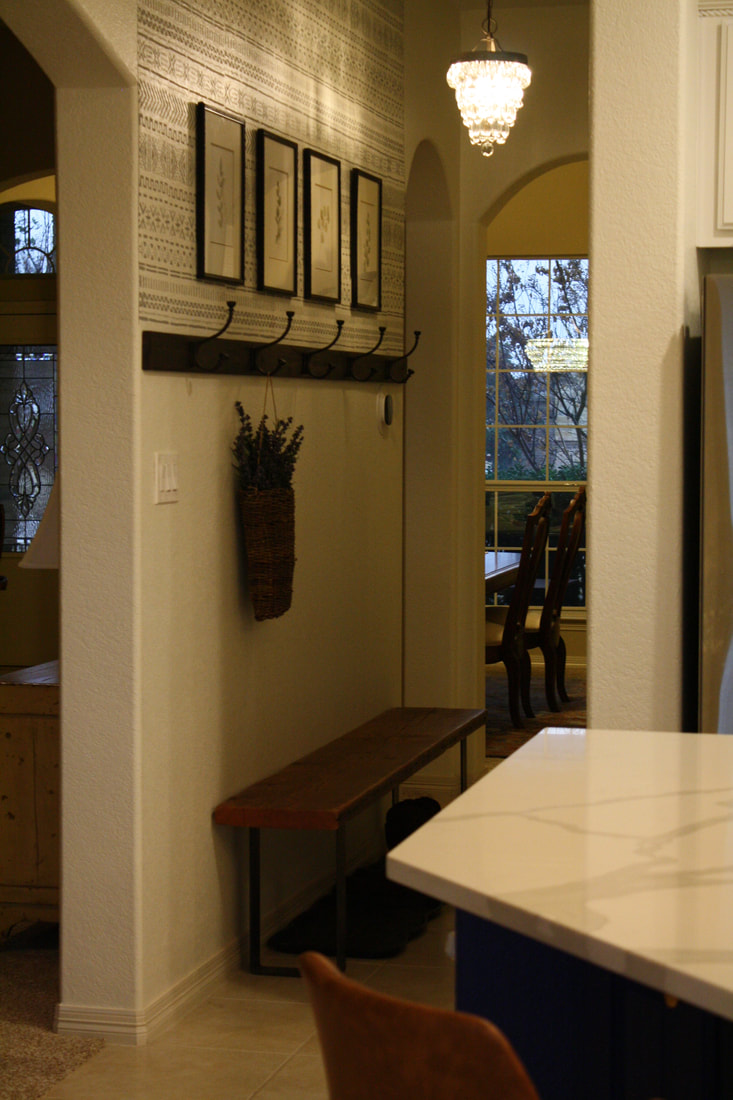  Making lemonade from lemons We didn't find out that our dishwasher was leaking until I started pulling the ugly faux-brick off the kitchen bar and noticed that the bottom of the bar and the wood floors were soaked with water and starting to warp. A phone call to insurance and their assigned contractor later and a kitchen renovation was underway! Obviously they didn't pay for all of it, but they paid for a decent portion which helped us justify making a few extra updates on our own dime. Our ho-hum kitchen had bored me for years. We found out a few months after moving into our home that there was a kitchen window that had been tiled over--inexplicably. I can't even imagine why. It reduced the natural light so much it made the whole house seriously dark. (enjoy me in hair curlers and an apron- it's the only "before" picture I could find hahaha)
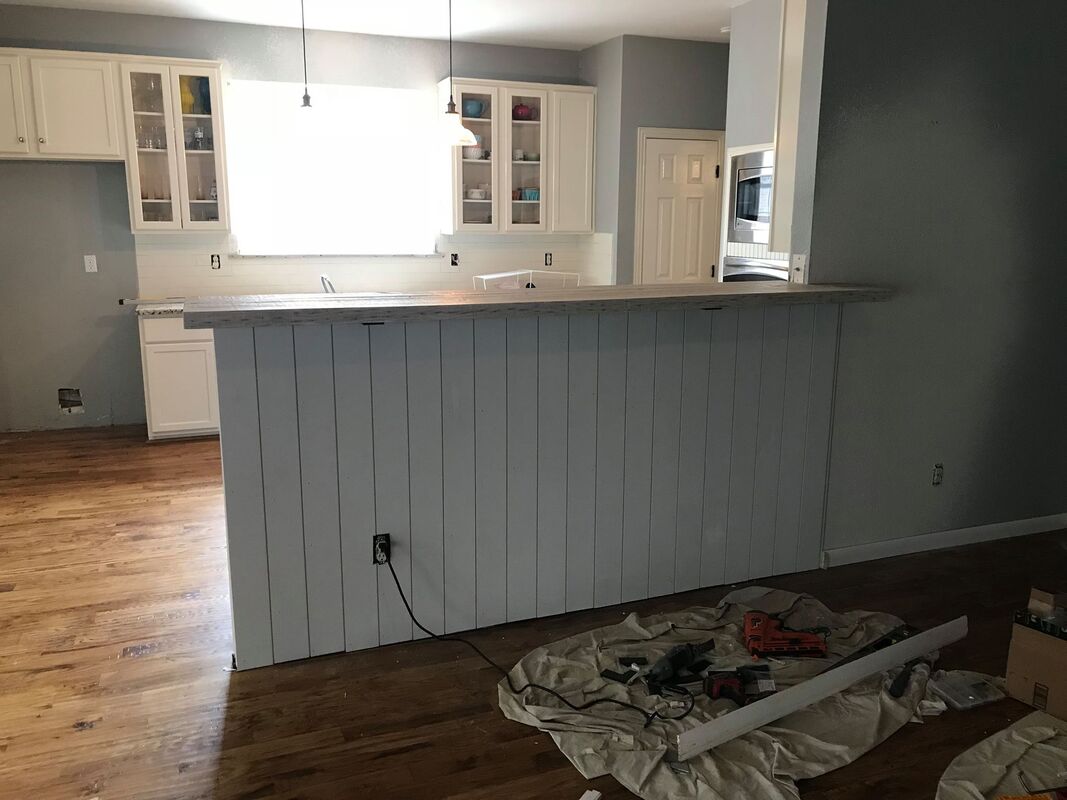
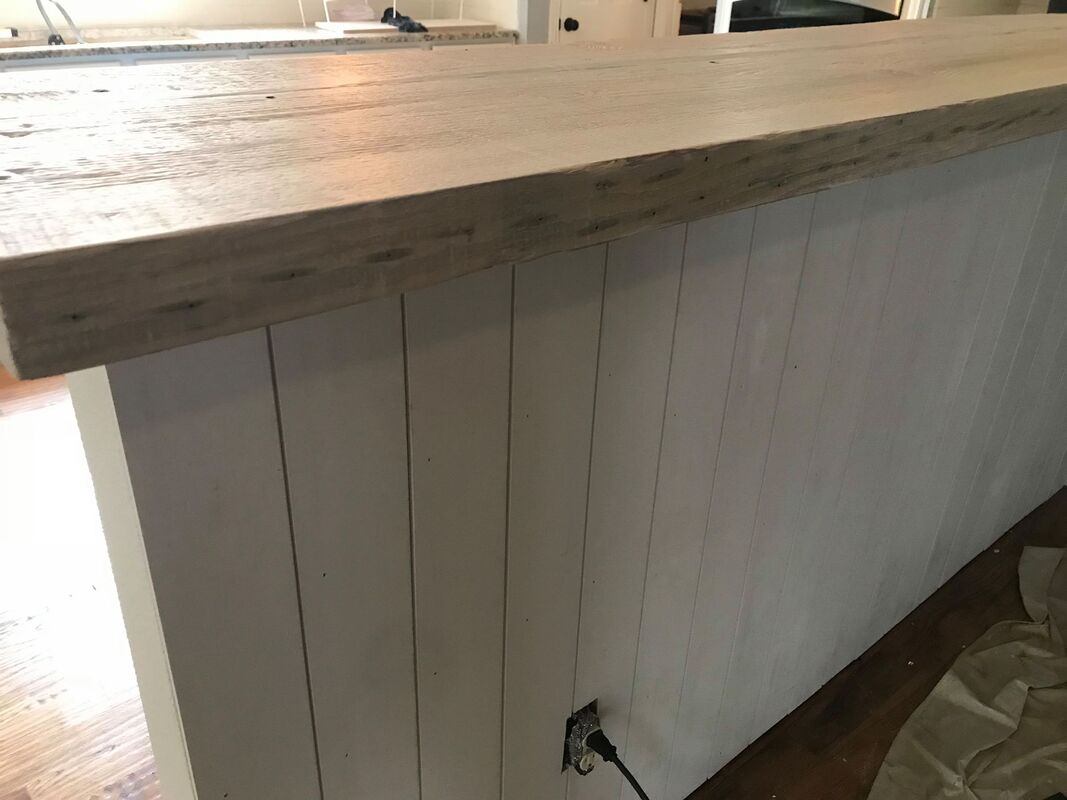
We started by demo'ing the dark & dated backsplash and opening the window up and adding shiplap to the bar. I drove down to Reclaimed Designworks in Dallas and found some yellow oak salvaged from a Southern cotton mill circa the 1860's. We lightly sanded (so as not to lose too much of the character), lightly white washed, and sealed with Modern Masters Exterior Dead Flat Varnish. We chose a bone white subway tile for a sophisticated and clean backsplash look.
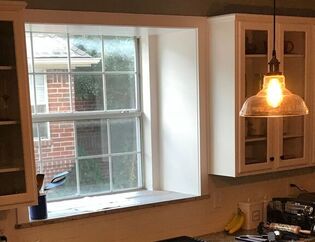
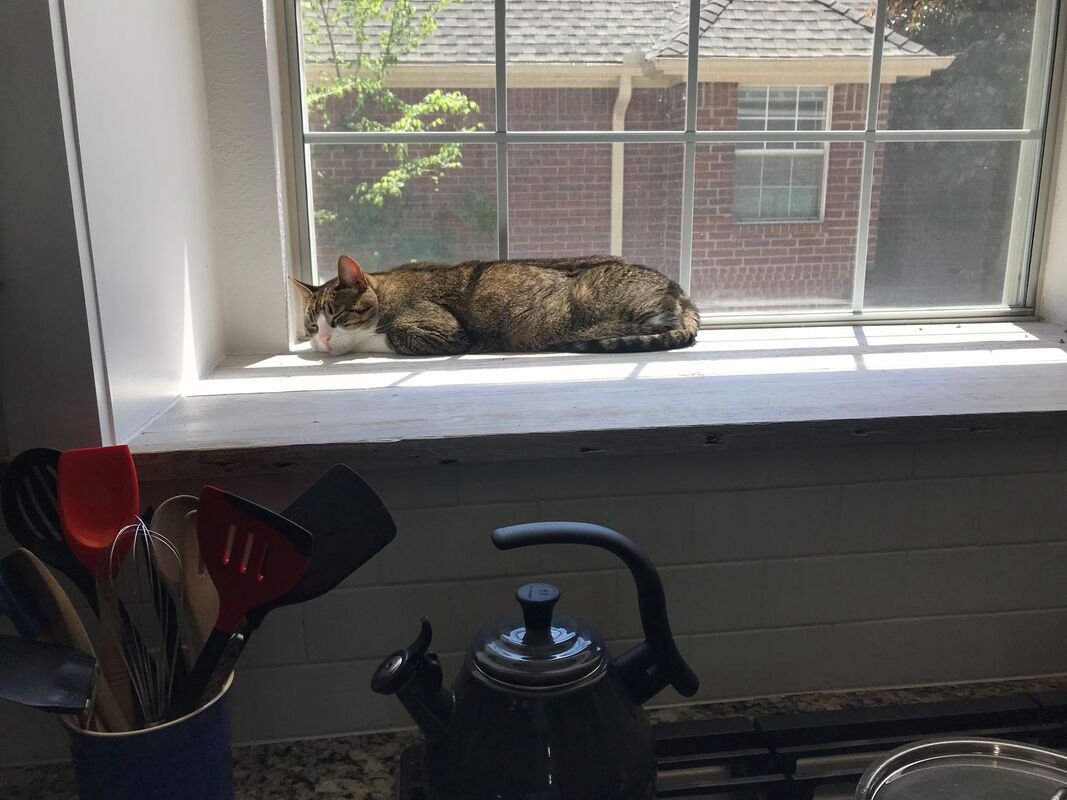
We hit a few hitches with opening up the window that we weren't totally expecting. First, the window was like something from Dr. Seuss all slanted and off-kilter. The contractor built a nice new box frame for it to straighten it out. Then we had to find a new material for the window ledge. We went with a matching salvaged wood to the bar. It was a big hit with our cat Handsome Rob.
I ordered 4 different sets of hardware before landing on Restoration Hardware's Duluth collection in brass. I highly recommend-it was totally worth the price (and you get a good discount when you sign up for their membership).
I also ordered Restoration-Hardware look-alike pendant lights from Lighting New York; the Quorum 804-17-80 Signature 1 light, 17" aged brass pendant. With a coupon it was $163 compared to Restoration Hardware's $516 price tag. 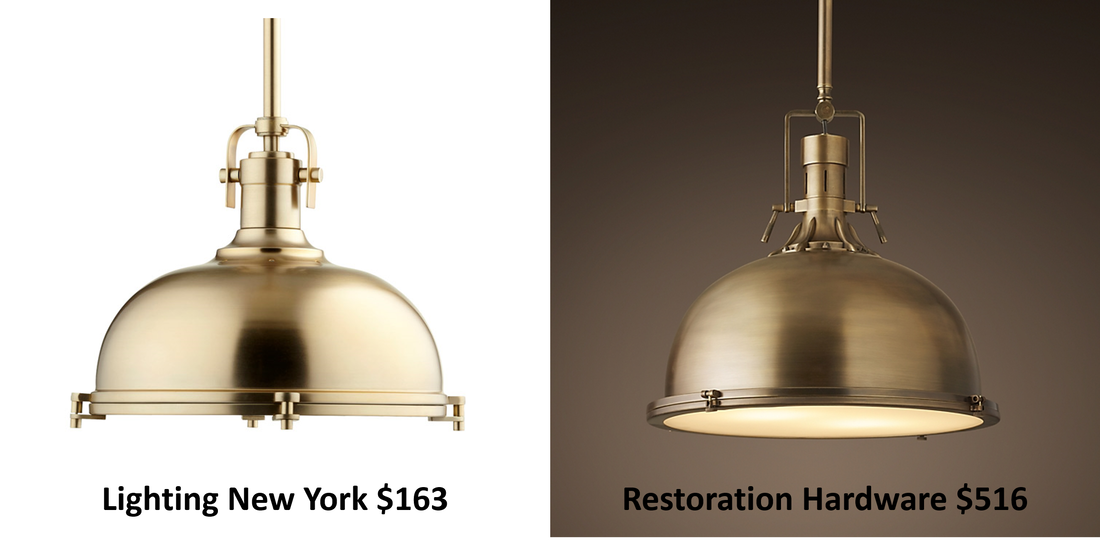
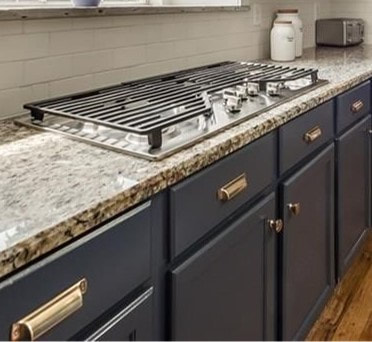
Other upgrades to the kitchen included cutting into the existing granite counter tops to widen the cooktop space and add a new GE Profile Series 36" Gas Cooktop. Let me tell you... as an avid home chef - this upgrade was worth every penny and made me happy every single day!
The last upgrade was maybe tied for first favorite with the cooktop... the 33" single basin sink by Krauss in stainless steel and Kohler's polished chrome artifacts kitchen sink faucet (K-99259-CP).
Without further ado... here's the full reveal! 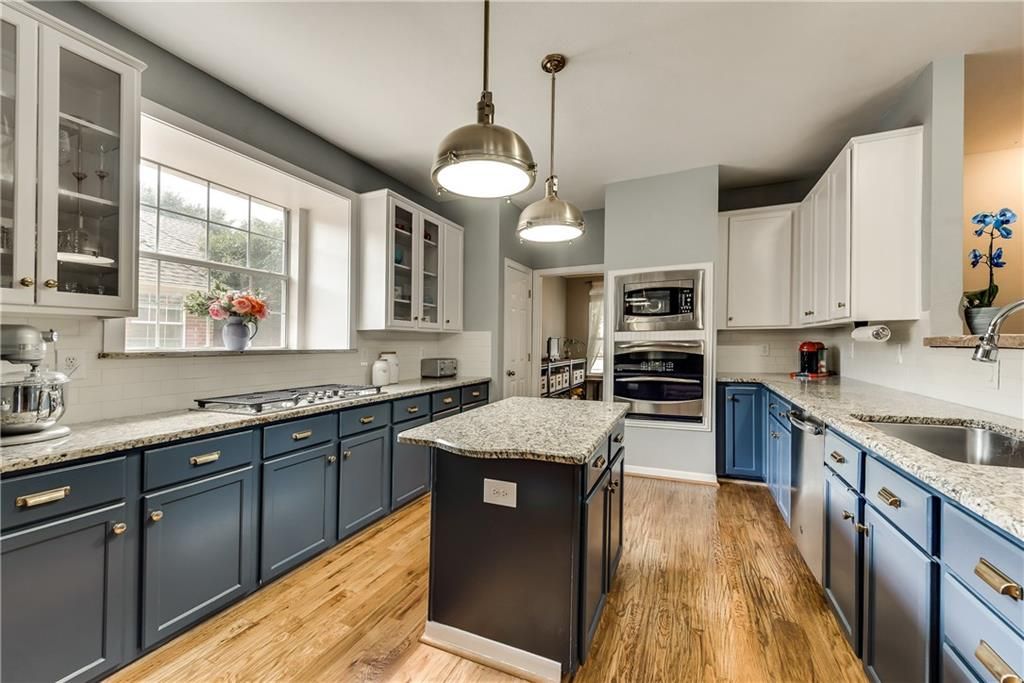 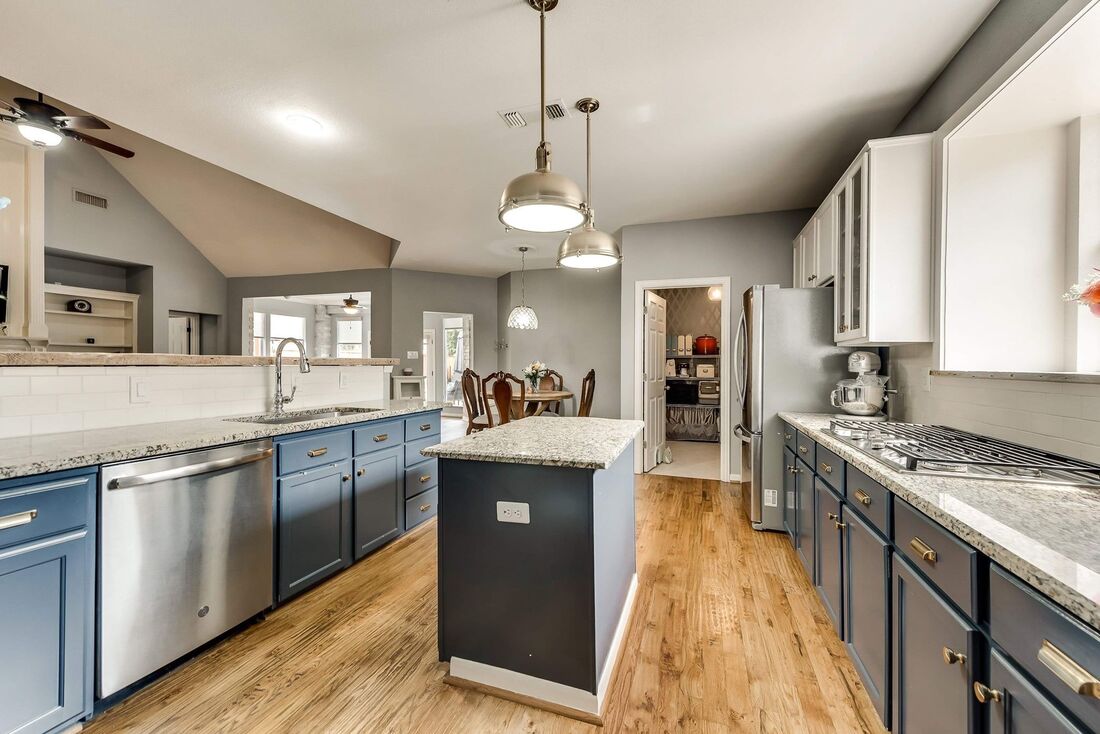 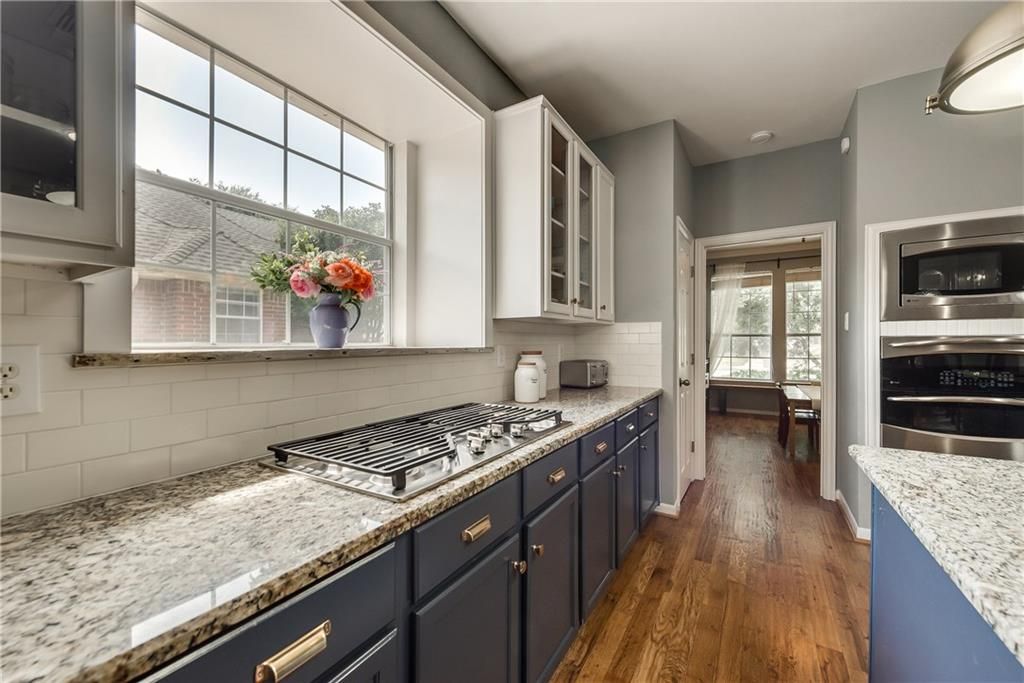 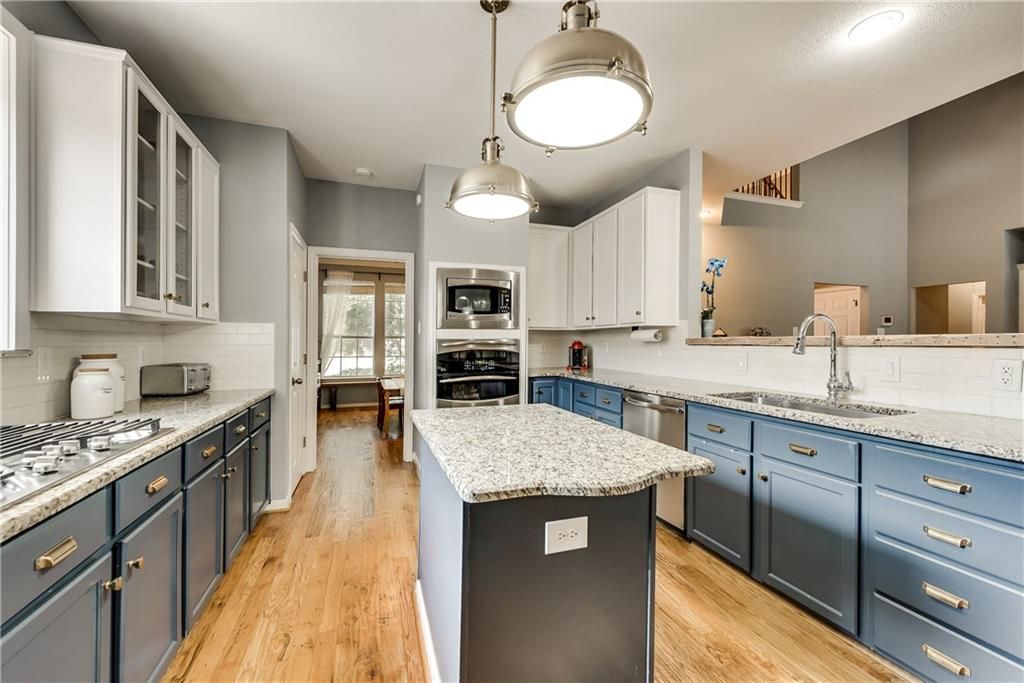 Products used in this project:
*Disclosure: This post contains affiliate links, meaning that I get a commission if you decide to make a purchase through my links, at no cost to you. I'm right-brained and my visual surroundings tend to have a strong influence on my mood/emotions. Our fireplace and the tile area in front of our patio door would just hurt my eyes to look at them, They were this ugly orangish builder-grade tile. I thought about replacing the tile entirely but we've got a mile-long list of updates, repairs and renovations that we want to make to our house that total something like $100K... That basically means we have to prioritize our projects and find ways to do some of them inexpensively. When I found a handful of pins on Pinterest that showed how easy it was to stencil & paint tiles instead (for 1% of the cost), I had to try it! I felt pretty confident I could tackle this project on my own after stenciling my laundry room wall pretty well. So I searched through the stencils at cuttingedgestencils.com and found the perfect one, the Amalfi stencil. I emailed their customer service and requested custom sized stencils made-- 11 3/4” square for the fireplace and 17 3/4” square for the patio entryway. They cost a cool $38. Rust-oleum's chalk paint is a bit pricey and I needed to buy most the materials new. In total it cost $250 which is basically nothing compared to removing/replacing tile!! Shout out to Cutting Edge Stencils- they have fantastic tutorial videos that painstakingly illustrate how to use the stencils. I watched a few and felt entirely prepared to get started. One easy weekend project later, I declare our newly painted tiles to be beautiful and a total Pinterest WIN! If you’re considering this for your home, all I can say is don’t be intimidated. It's a shockingly easy project to tackle. This one was more about being fastidious and following the steps closely. I’ll skip to the chase and start out with the before/after photos—the best part of any blog!! 😊 See the project steps/instructions just below the photos: 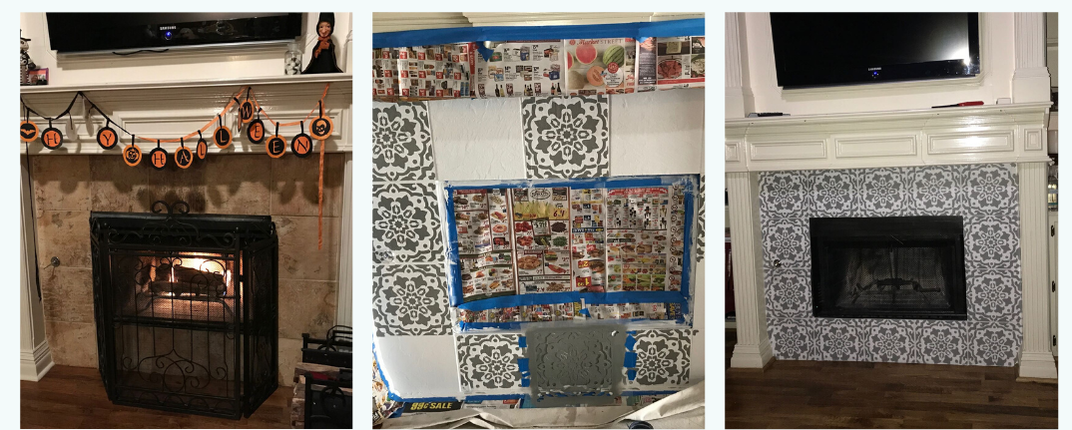 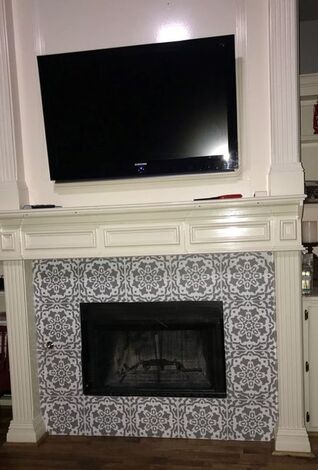 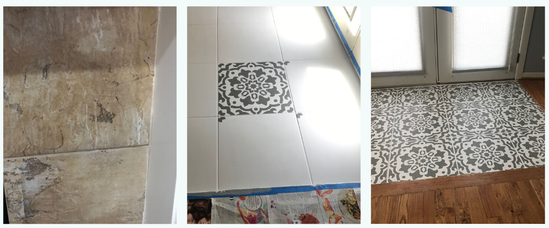 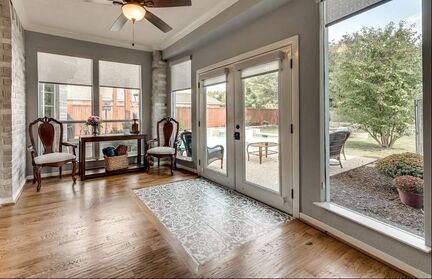 HOW I PAINTED MY UGLY BUILDER GRADE TILE FLOORS:
It’s been 5 months since I painted the tile and it still looks brand new. I’m confident it will hold up for years. They’re a serious statement look. I can’t help telling people I painted them and they’re always blown away. The contractor who renovated our bathroom couldn’t believe it. He took pictures to share with another client who’d just been talking about painting their existing tile. The best part? This cost is about 1% of what tearing the tile out and replacing it with new flooring would’ve cost! This project only cost $250!!! *Disclosure: This post contains affiliate links, meaning that I get a commission if you decide to make a purchase through my links, at no cost to you.
We’re in the process of buying a new house now which has too much tile for my taste, but we don’t have the budget to pull it out. So, I definitely see a lot more tile painting in my future. I’ll add pictures from that project in this blog too so you can see more examples. Thanks for following this blog and please comment with questions or feedback and share with friends!!
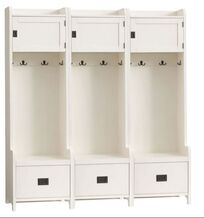
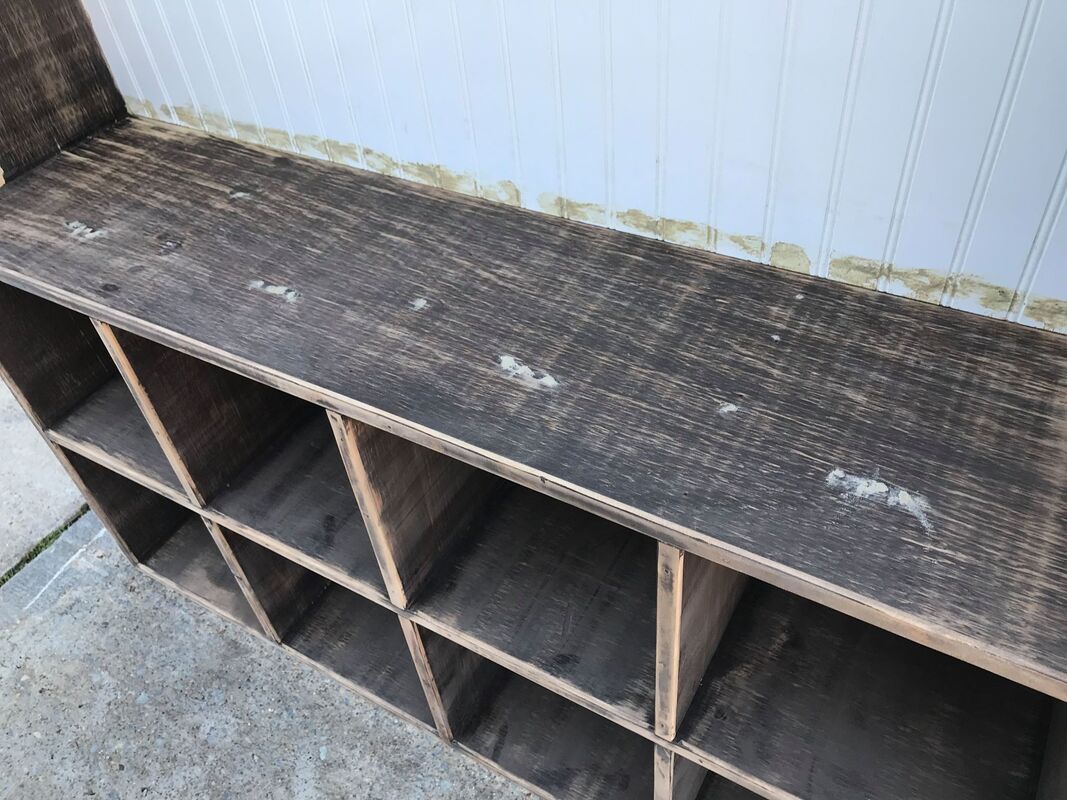
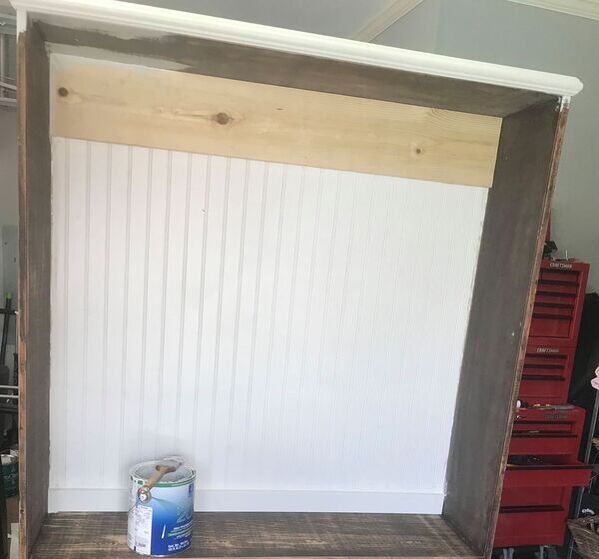
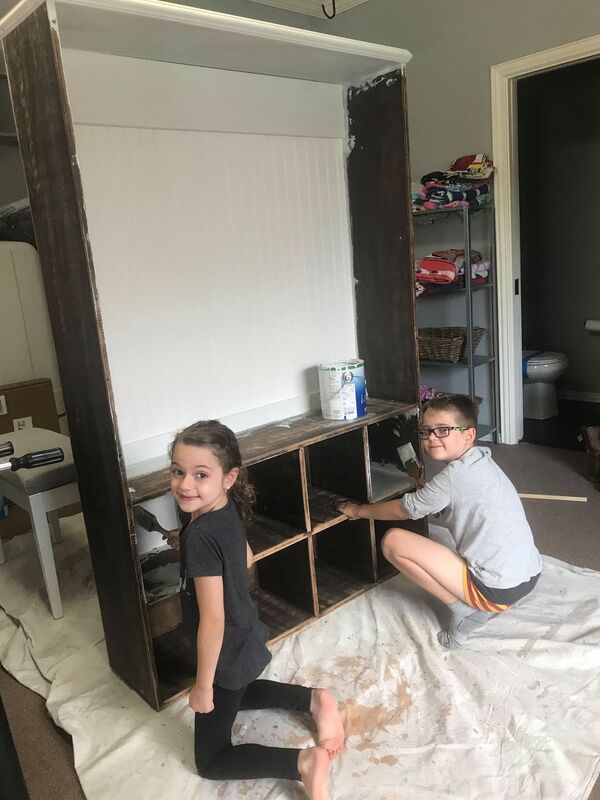
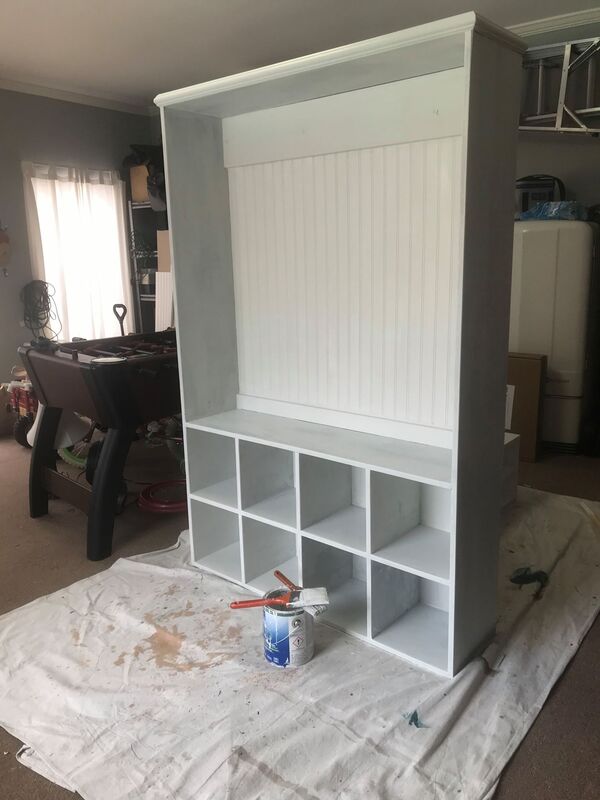
 My husband came across this coat rack that had a long life at a local church and they were looking to unload. Do you see the potential in it? Flip your screen upside down and you might start to see it... First thing we did was remove the hooks and flipped the whole piece upside down. We filled in any cracks or gaps in the wood and cut a board of wainscoting down to size using a circular saw. We glued it on the back and attached it using finishing nails. Then we attached some trim to the top, bottom, and a 2" x 4" across the top where the hooks will go.
Then I put the little ones to work; nothing like some good ole child labor to do a project on the cheap (Just kidding - I did most the painting, but of course they were dying to "help").
The last step was to add some Liberty coat and hat hooks that I bought for $3 each off Amazon and voila! 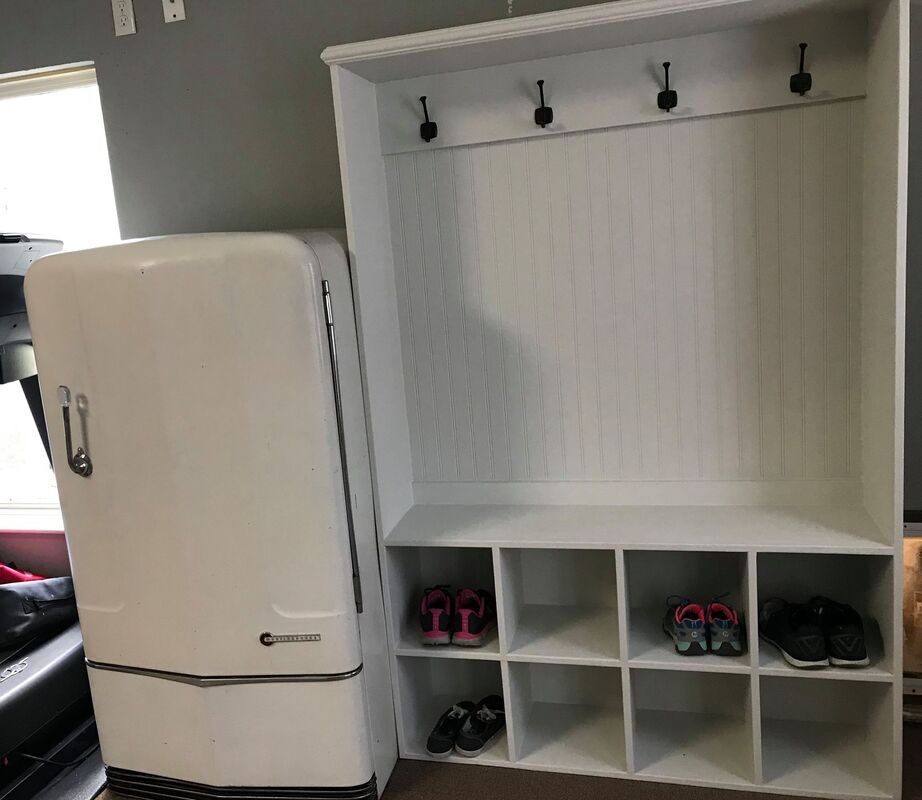 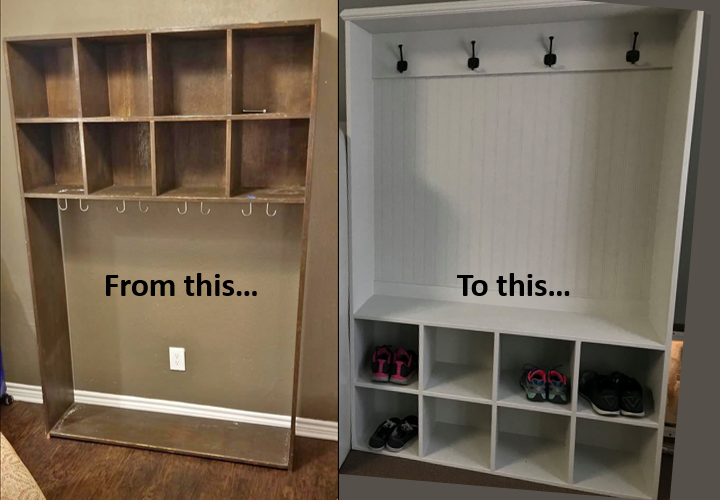 Products used in this project:
*Disclosure: This post contains affiliate links, meaning that I get a commission if you decide to make a purchase through my links, at no cost to you. I used to love wrapping presents. I worked at Restoration Hardware during college (terrible idea btw - I shopped more than I worked and ended each shift in the negative $$). I learned the fancy retail way of gift wrapping using sharp edges, double sided tape, and folds along the edges. I spent hours wrapping a handful of beautiful gifts for my boyfriend/fiance/husband back in my roaring 20's. Now we've got two kids and what seems like thousands of thousands of gifts to wrap each Christmas. This situation led to me dreading Christmas gift wrapping time. I'd put it off, get all stressed about it, it was no good. I was so grateful when I got a few of the ugly blue Amazon cloth gift bags - I reused those over and over. It got me thinking. I could sew these bags in cute Christmas fabrics - spend 2-3 hours sewing them and then re-use them every year; saving myself hours of effort and stress every Christmas. I downloaded a Jo-Ann's Fabrics coupon and bought a yard of fabric in practically every Christmas fabric they had. It did take an initial investment of about $100 I think (but over the years I'll save $$ by hardly ever buying gift wrap again!). I did a mix of vintagey older looking fabrics and cartoon/disney fabrics for the kids. Look how great these came out! I adore the vintage old-timey look and feel of these under the tree. Let's not forget all the landfill fodder and poor sad trees that are wasted in every house as wrapping paper is ripped, wasted, and trashed every Christmas. Scroll below the pics for a link to the tutorial (it's so easy, it's basically sewing a pillow case with a ribbon added):     *Disclosure: This post contains affiliate links, meaning that I get a commission if you decide to make a purchase through my links, at no cost to you.
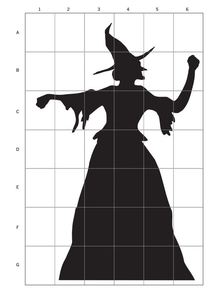
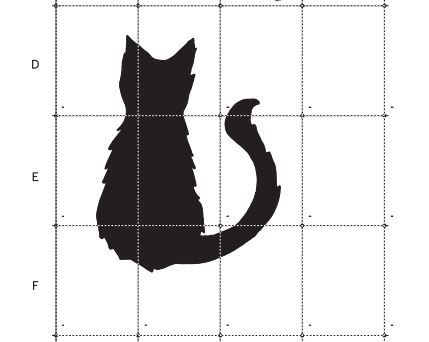
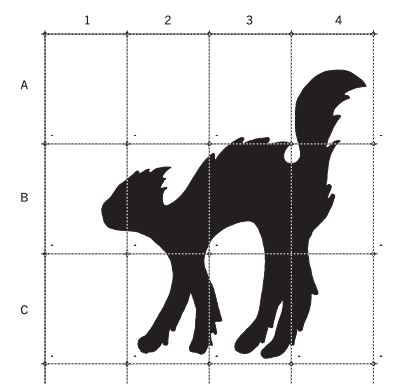
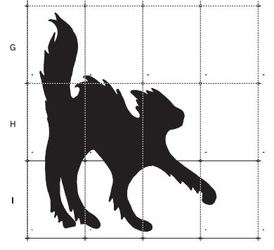
Materials: - Buy as much fabric as you'd like bags. I did about half a yard of fabric per a pattern which gave me 1-3 bags depending on how large or small I made them. I didn't really measure anything out because I wanted a million different size bags. - about 30” of ribbon per bag (a little more or a little less depending on bag size obviously) - Janome sewing machine - Thread of different colors - Fabric sewing scissors - Sewing pin set (with tape measure and pin cushion- all the basics) TUTORIAL: I'm not going to try and tell you how I did the sewing. Mainly because when I tried writing out I found it incredibly boring to try and originally re-write a blog that I followed for help on this. Spool of Thread's tutorial is better than anything I could put together. Very detailed. The only thing I'd add is not to sweat perfection. I left raw edges on the inside to save myself a few minutes effort (gasp) and I don't regret it for a minute! My husband and I made Martha Stewart's Witch and Cat silhouette lawn ornaments about eight or nine years ago. We put them out every year and we still love them! They're popular in the neighborhood and just make me happy. I highly recommend this project if you've got one weekend day to dedicate to it.. It's an easy one for beginners. I'm going to share how to get this done right quick:  Products used in this project: *Disclosure: This post contains affiliate links, meaning that I get a commission if you decide to make a purchase through my links, at no cost to you.
2. Now use the spray adhesive to adhere the whole which onto the plywood. Do the same for the cats. Use your jigsaw to cut out the design. When you're done you peel off the templates. We sanded the edges slightly and then painted them all black. Let them dry for about an hour. 3. Now you attach the conduit to the back of the witch and each cat using the conduit straps - 3 for the witch and 2 for each cat. We cut the witch's conduit 6' long and 3' long for the cats using a saw. 4. Don't forget to screw the cup hook into the witches' left hand so she can hold her lantern. Screw one more conduit strap on the back of the witches' right hand for the broom to slide into.
And you're done!! It's time to put them out on your lawn. You just hammer them in using a rubber mallet. Slide the witches broom through the conduit piece on the back of her hand and hang the lantern from the cup hook. I highly recommend a solar lantern, because then you're guaranteed that it will go on every night. I tried candles - which blew out within seconds of course (and probably broke fire laws) and led battery tea lights that you have to remember to turn off/on. Which obviously you don't ever remember. So solar is definitely the way to go! Place a cauldron at the witches feet for the full affect. Back light the witch and her cats using a yard stake-flood light like this one. You'll be the hit of the entire neighborhood. I highly recommend this project! I had a real life epiphany today. I've always loved the holidays. Christmas and Halloween are tied for my favorites. It was only today that I realized why it is that I love Halloween so much! Because I'm from Maine! And in Maine we like old things. Scary things. Haunted things. Our state treasure is Stephen King. You can see a flash of my hometown in Pet Sematary as the trucker who hits the boy in the beginning is driving along. Pretty much everyone I know back home will swear they've seen a ghost (myself included). We were often doing creepy teenage things like seances in cemeteries and communing with spirits through the Ouija board. Our homes, and churches, and graveyards date back to the 1700's. I came across this article from a friend's facebook post today that my hometown in Maine (Bucksport) is officially "the most haunted town in Maine." and I'm pretty sure that Maine is the most haunted state in the U.S. The tomb of our town's founder is cursed by the witch that he burned at the stake (that graveyard is... maybe 6 houses down from my mom's house). Ghost Hunters have done several shows there (and found it haunted of course) and at Fort Knox across the river. It's all a lot of fun. The crisp fall air, piles of leaves, dressing up and trick o'treating. It's just pure FUN. Just watch Hocus Pocus and you get an idea of the joy that is a New England Halloween. So I try to bring a little bit of Maine to every place I've lived. If I had unlimited time and funds my whole house would be a walk through horror fun house. Each year we do a little more- this is last year: 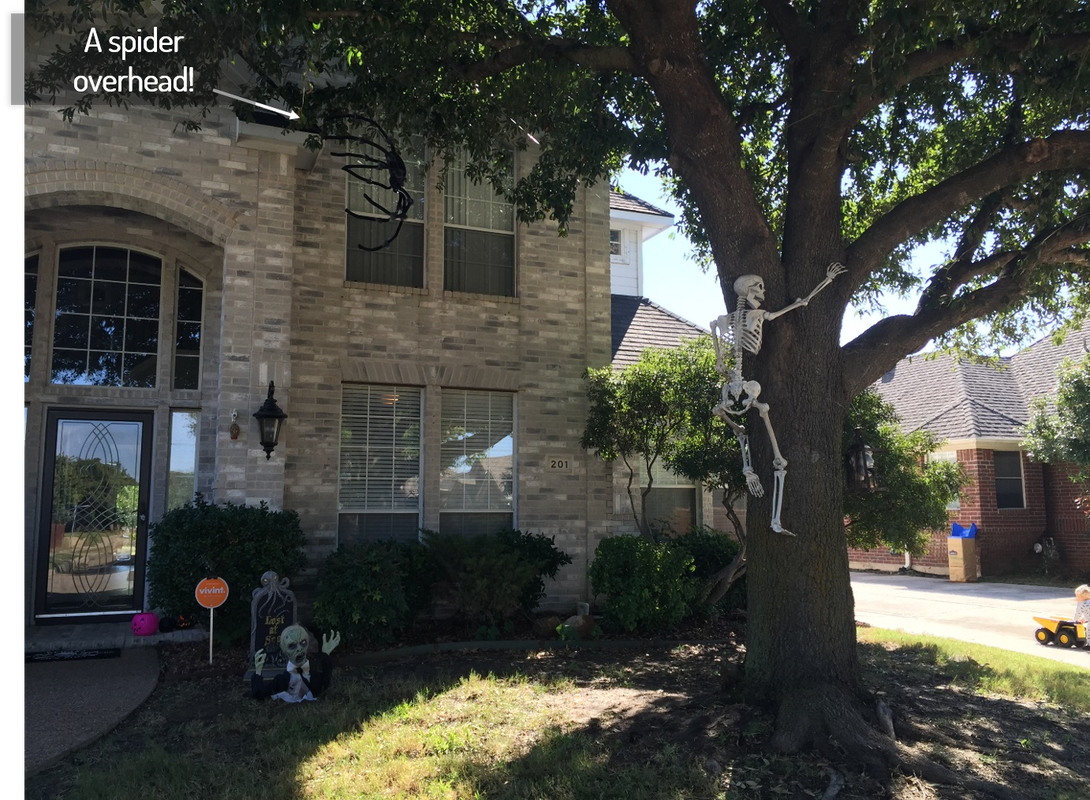 We hung the skeleton using fishing wire. A spider hangs above by fishing line as well. 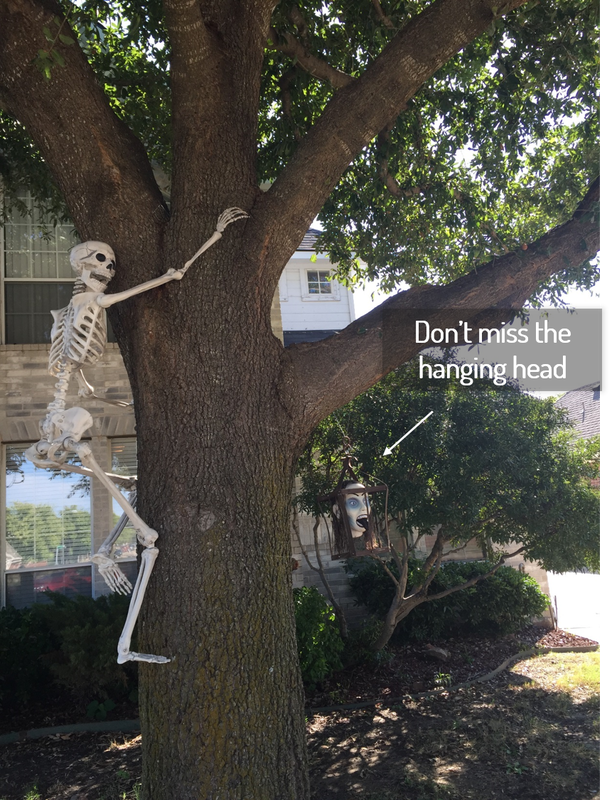  I've always got to add a nautical theme. Eventually I'd like a whole graveyard with wrought iron fencing... I'll likely work on that this month!      I dress up every year- because it's fun! Last year I was Maleficent and the kids were Hiccup and Astrid from How to Train your Dragon. Anyway, come back soon for a tutorial on how me made the Martha Stewart inspired large witch plywood cutout with her two cats. I'll also share the holograph how too. There are so many fun things you can do! Here's a share of my favorite scary front yards. Enjoy!
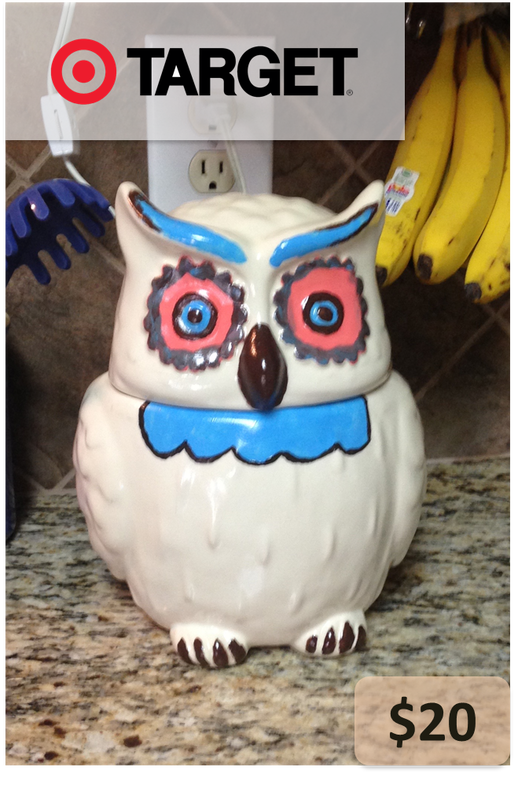
I had my eye on Anthropologie's "A Real Hoot Canister" cookie jar for ages. It was so darn adorable. But who buys a cookie jar that's $68? I mean, they're basically ornamental right? No. No they're not. Let me tell you about this. The most fascinating, riveting, enchanting tale you'll ever hear. So I was in Target one day, A delightful 1 hour staycation escape from the demands of urban working motherhood. All of a sudden I came across an adorable (cheap at $20) all-white owl cookie jar that was remarkably similar to the Anthropologie cookie jar I'd been coveting for months.  I can be a little crafty. Not a lot. But I figured I had the medicore amount of artistic talent that would be required to transform that boring white cookie jar into a look-alike Anthropologie Real Hoot Canister. So I hit up the Hobby Lobby for some $1 craft paints; I got blue, pink, brown, and black. I had some fine tipped paint brushes already. I channeled my inner-Bob Ross and copied the Hoot Canister as closely as I could. It's not perfect... but I kind of like it even more because I made it. And I saved money. It makes me happy every time my adorable perfect little children put their cute tiny little hands in the cookie jar. It's just quintessential Norman Rockwell childhood memory material that makes my heart happy. Saving $50 is just the cherry on top.
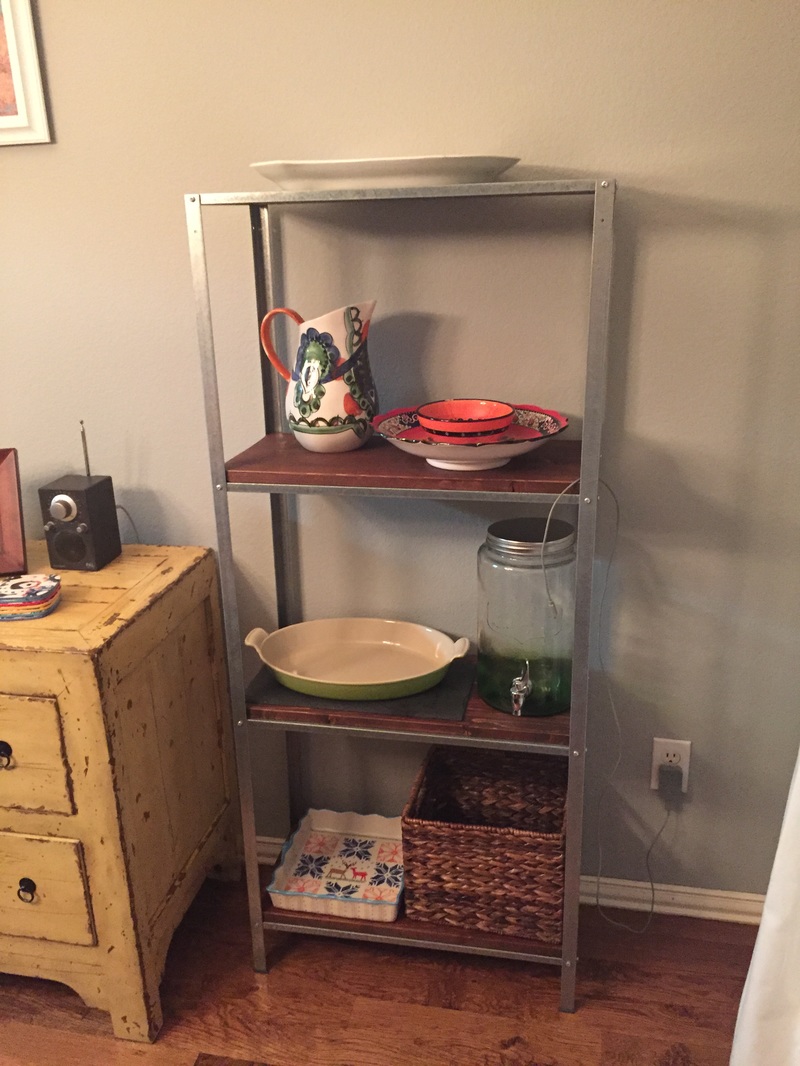
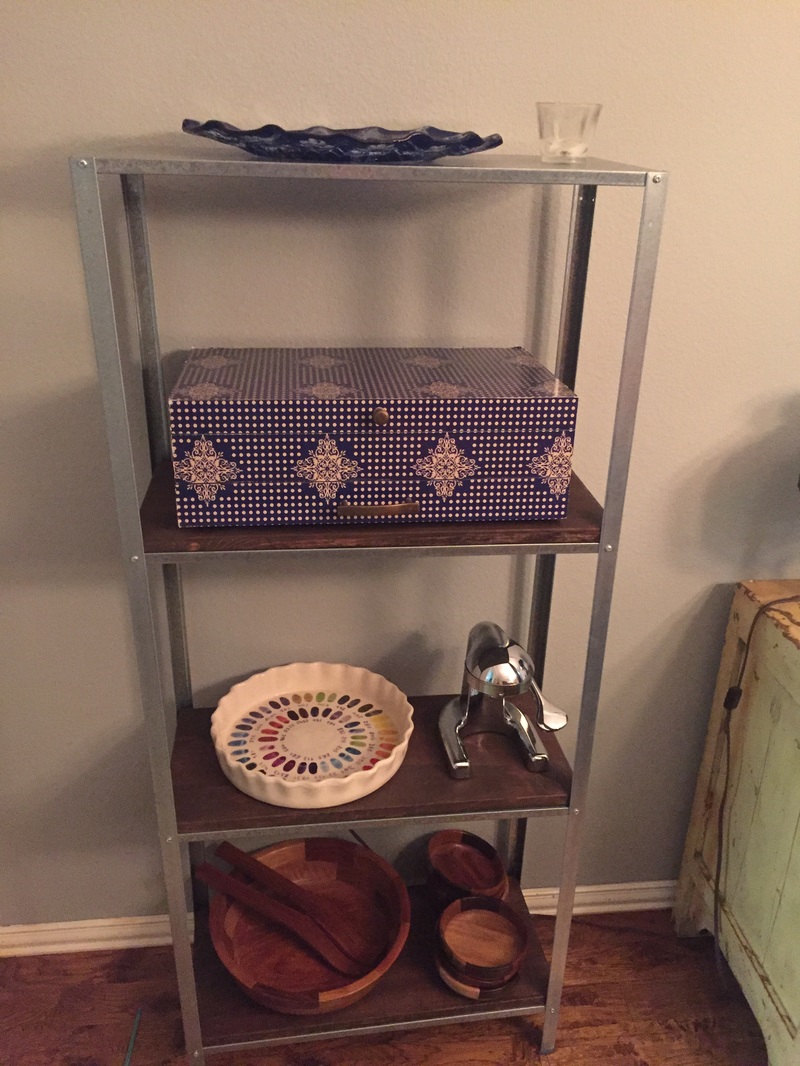
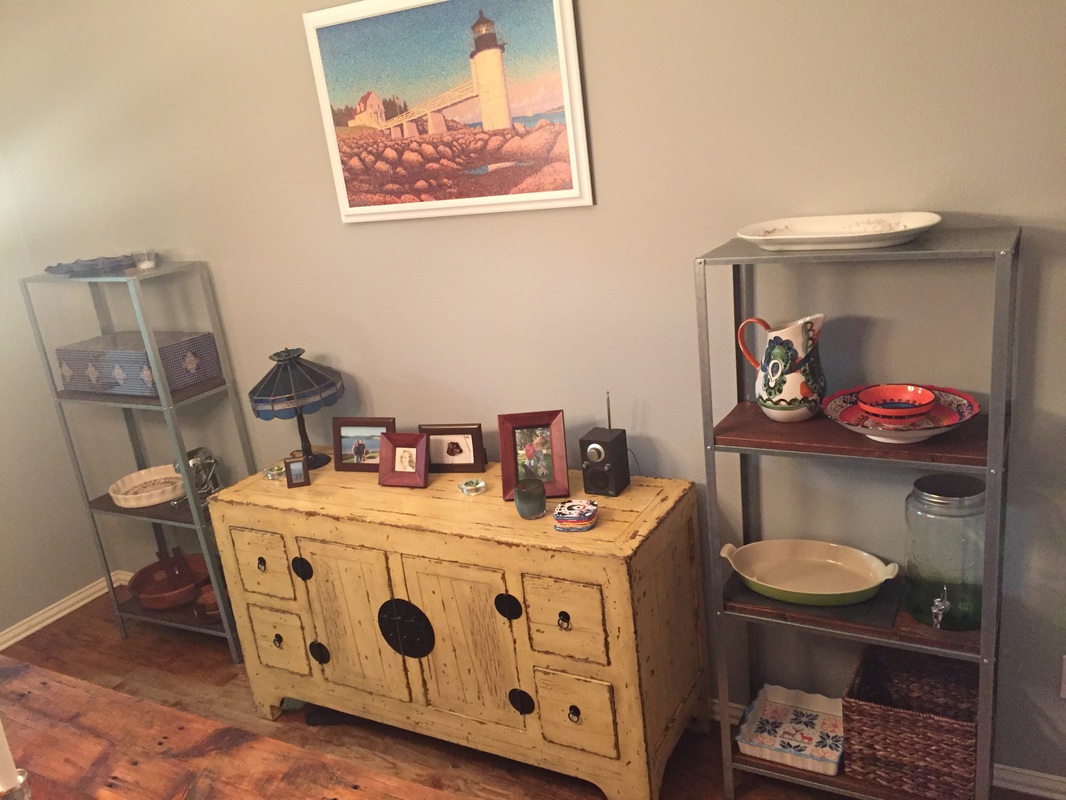
I worked at Restoration Hardware during college. It was a mistake. I ended up spending more $$ there than I ever made. $10/hour doesn't go far towards a $1850 Reclaimed Russian Oak Parquet Shelf when you've got college to pay for and ramen noodles to buy. Years later, I eventually came across the Ikea Hyllis Shelf for $15. Visions of industrial shelving that were 99% cheaper danced through my head. So I bought 3 of them - 2 for the dining room and 1 for the kid's play room. Converting the Hyllis to a fancy industrial shelf look alike was so easy it's hard to believe. Buy some wood. Cut it down to the shelf size. Sand the corners/edges to give it a worn down aged look. Apply 2 coats of wood stain. That's it. Literally.
AND...
 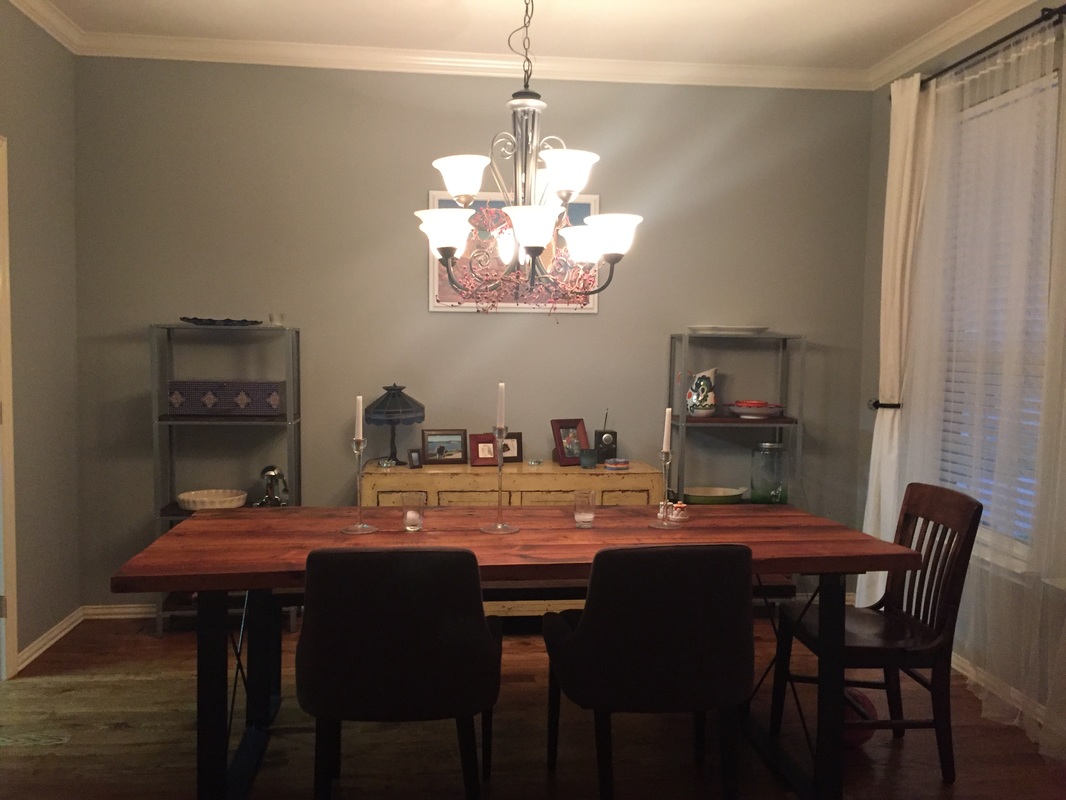 I'd like to add a disclaimer that I realize my picture on this wall is too small for the space. I need to make a larger custom frame... that's an upcoming DIY post one day.
|