|
Casita Chronicles: Family Adventures on the Open Road
Our New Travel Trailer: The Casita Heritage My husband and I just bought our first travel trailer – the Casita Heritage! After years of dreaming about hitting the open road and exploring the great outdoors with our family, we finally found the perfect match for our needs. The Casita Heritage is the most reasonably priced hard-shelled fiberglass RV on the market, offering an ideal blend of affordability, durability, and comfort. While I’ve always admired Airstreams, their price tags are a bit too extravagant for our taste. The Casita Heritage, on the other hand, fits our budget without compromising on quality. Why We Chose the Casita HeritageWe have a 12-year-old daughter and a 14-year-old son (as of summer 2024), and we wanted a trailer that could comfortably accommodate the four of us along with our beloved Frenchton dog, Max. Living in Dallas, we knew that a trailer with a strong, reliable air conditioning system was a must to beat the summer heat. That’s where the Casita’s hard shell comes into play – it holds the cold AC like a champ, turning our trailer into a cool, refreshing haven even on the hottest days. Visiting the Flagship Sales CenterOur journey to finding the perfect travel trailer began at the Casita flagship sales center in Rice, Texas. We spent an entire day exploring the different models and configurations, weighing the pros and cons of each. The Casita Heritage quickly stood out to us with its practical layout, ample storage, and cozy yet spacious interior. The team at the sales center was incredibly helpful, answering all our questions and allowing us to fully understand what makes the Heritage model special. Features and Benefits of the Casita Heritage1. Durable Hard-Shell Fiberglass ConstructionOne of the primary reasons we chose the Casita Heritage is its durable, hard-shell fiberglass construction. This not only ensures longevity but also provides excellent insulation. The fiberglass exterior is easy to clean and maintain, making it perfect for long-term use and various weather conditions. 2. Efficient Air ConditioningAs mentioned, the AC in the Casita Heritage is a game-changer. Designed to keep the interior cool and comfortable, the air conditioning system is powerful enough to handle the scorching Dallas summers. This feature was a non-negotiable for us, and the Casita Heritage did not disappoint. 3. Compact and Efficient InteriorThe Casita Heritage is undeniably tight on space, but we’ve become masters of efficiency and ingenuity. Our family has embraced the challenge of living in a compact space, which has encouraged us to spend more time outdoors except when we need a break from the weather or to sleep. We affectionately call our trailer “the egg” because of its white, round shape. It’s the smallest trailer in the RV park by far, and we find its quaint vibe both hilarious and adorable. 4. Maximizing StorageTo make the most of the limited space, we made a trip to The Container Store and spent a few hundred dollars outfitting the trailer with storage containers in every nook and cranny. This effort has allowed us to live tidily without going crazy. Our prior Navy experience has taught us the importance of keeping things organized and tidy, and it shows in our perfectly arranged little trailer. Our Future AdventuresWith the Casita Heritage as our home on wheels, we’re excited to embark on countless adventures across the country. Whether we’re exploring national parks, visiting family, or simply enjoying the beauty of nature, our travel trailer will be the perfect companion. We look forward to sharing more about our journeys, the places we visit, and the experiences we have along the way. Final ThoughtsIf you’re considering a travel trailer for your family, we highly recommend checking out the Casita Heritage. Its combination of affordability, durability, and comfort makes it an excellent choice for both new and experienced RV enthusiasts. Stay tuned for more updates on our travels and tips for making the most of life on the road with a Casita trailer!
0 Comments
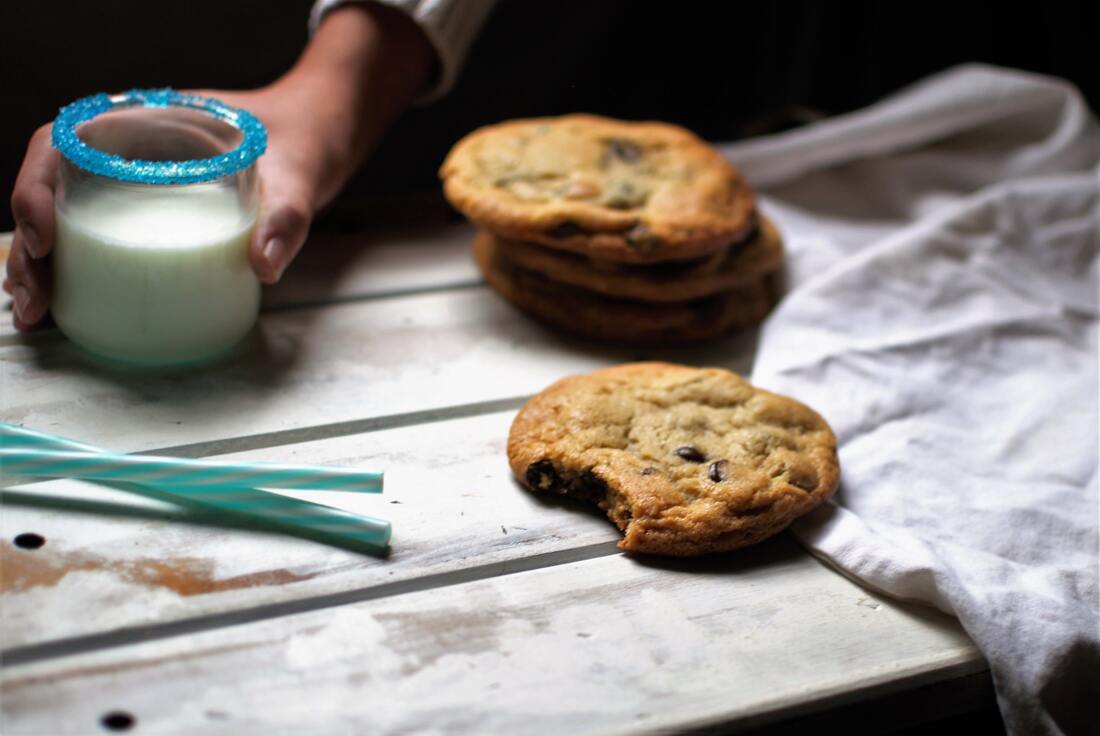
These are a staple in our family. It's super easy and delicious. Enjoy!
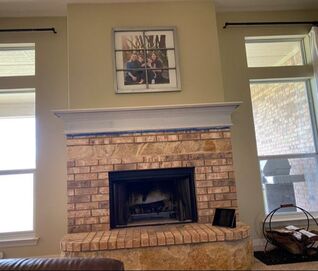
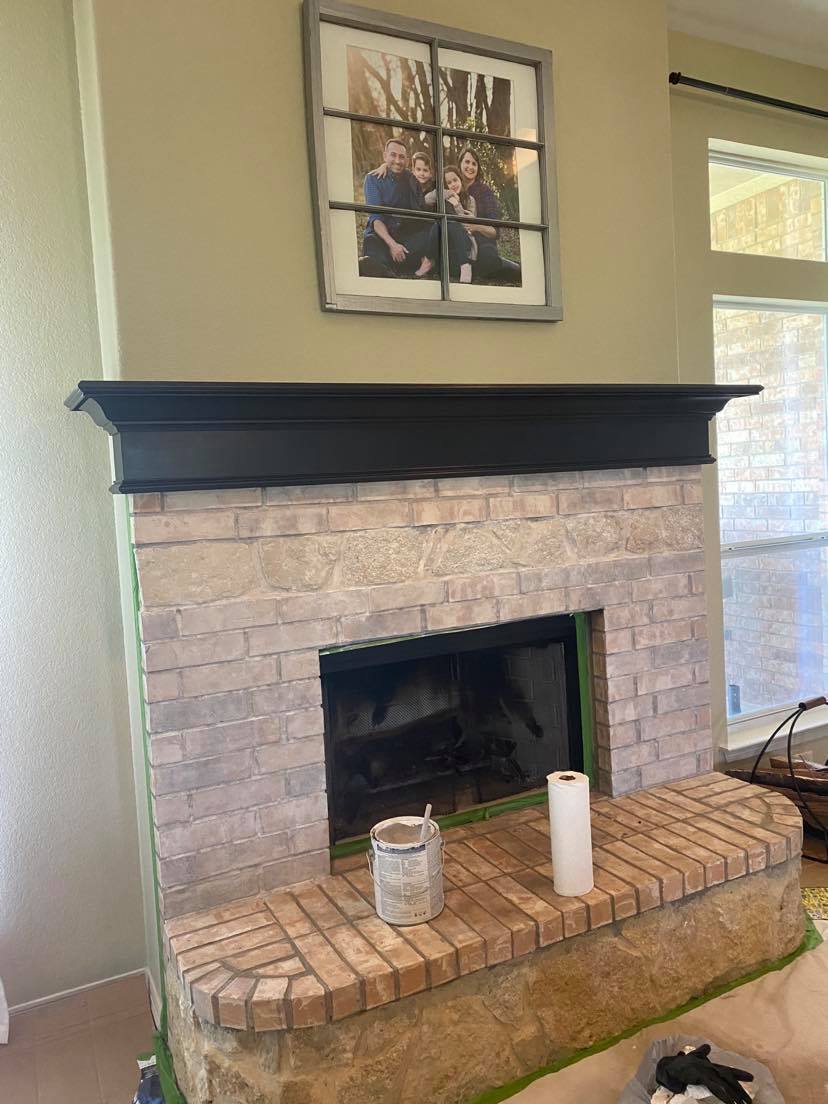
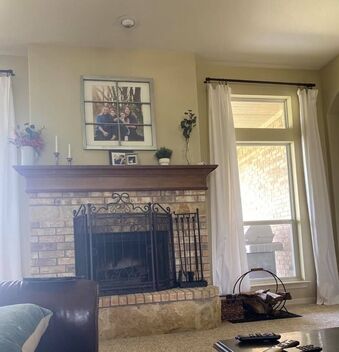
INGREDIENTS: 4 cups or about 1 1/2 lb of shredded cooked chicken breast. I either buy a pre-cooked rotisserie chicken or I'll roast my own (see recipe HERE). 2 cups shredded monterey jack or cheddar cheese 2 large green onions, chopped 1 can of drained regular rotel 1/2 cup heavy cream 1/2 cup cilantro, chopped salt & pepper to taste A package of ~15 tortillas DIRECTIONS: Preheat oven to 350 degrees. Oil a large baking pan Toss all ingredients together in a large bowl (besides the tortilla obviously) Place about 1/4 cup of filling into each tortilla and roll it up. Place, seam-side down in the prepared baking pan. Cover with foil. Bake 25 minutes. Remove the foil and sprinkle 1/2 cup of cheese on top. Bake for another 5 minutes. I've got an open concept layout and after updating our kitchen, the adjacent living room fireplace stuck out terribly. The mantle was the same color as the old kitchen cabinets (brown oak). My neighbor, Lesley Lockhart, is the owner and creative designer at Artfully TLC. She turned me onto Miss Lillian's NO WAX Chock Paint. I was inspired by her fireplace update (see HERE) and how quick/easy it was. So, I decided to just go ahead and paint our mantle place. STEPS:
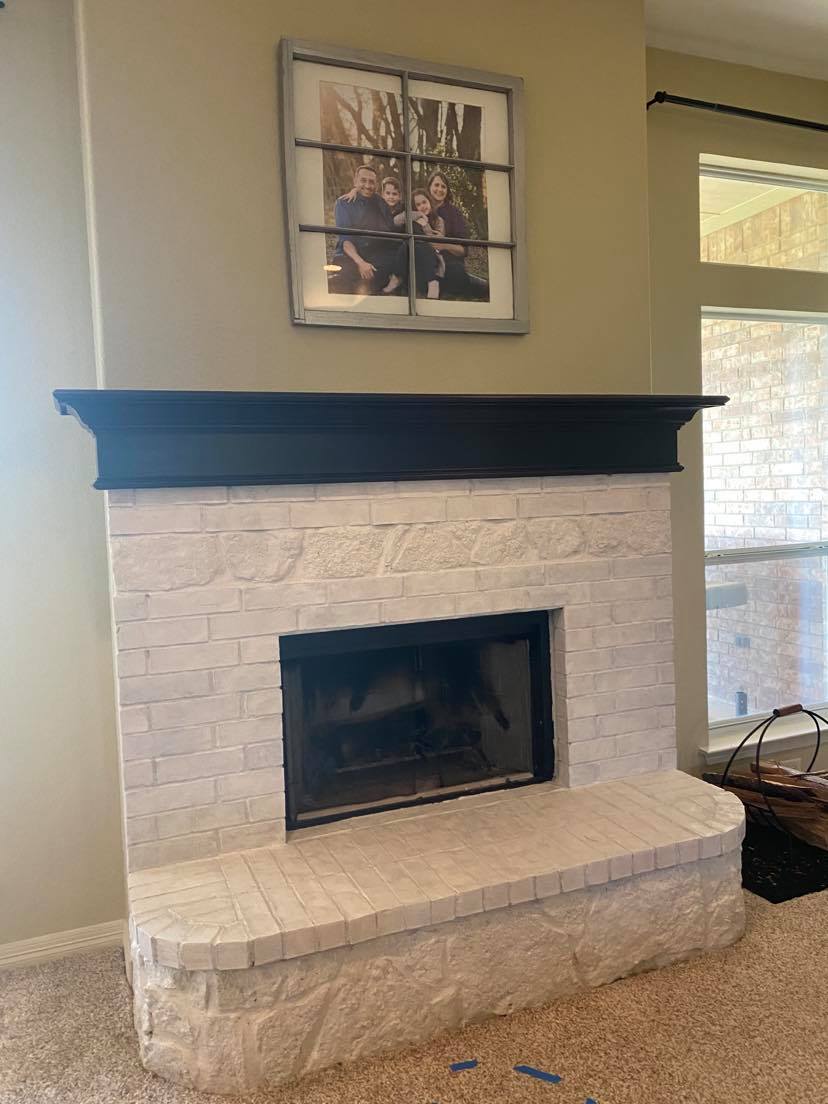
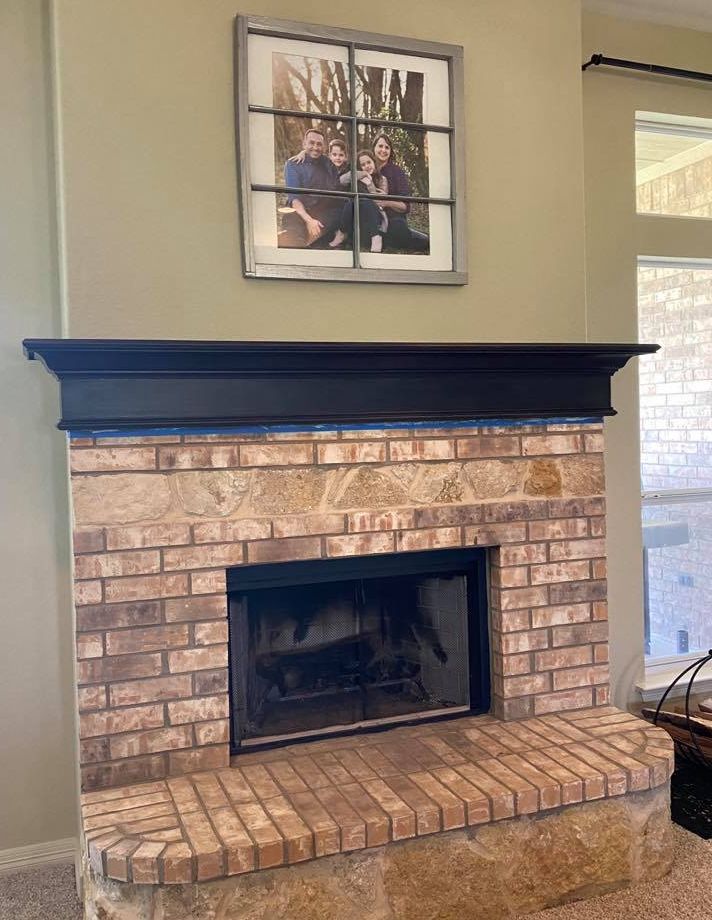 Next I painted the mantle with Miss Lillian's Industrial Chock Paint. I loved the color, but I wasn't yet satisfied. It didn't feel done. It just wasn't enough! I've never been a fan of the color of this brick so after thinking it over I decided to whitewash it. The following steps are... 1. I started by cleaning the fireplace bricks using Rust-Oleum's cleaner and degreaser before taping it off and putting a tarp on the floor. 2. To make the whitewash, I used the same white as our kitchen cabinets, Benjamin Moore Chantilly Lace OC-65. It's an oil-based paint, so I added mineral spirits to thin it for the whitewashing (50/50 mix). 3. Whitewashing was pretty darn easy. I just applied the paint on using a paint brush, being careful not to drop. I started with a thin layer, wasn't satisfied with the pinkish color (see picture on the left) and applied a second thin coat (see picture on the right). It was nice and looked a little better, and yet... still not complete or good enough. I wasn't satisfied. I wasn't done yet.
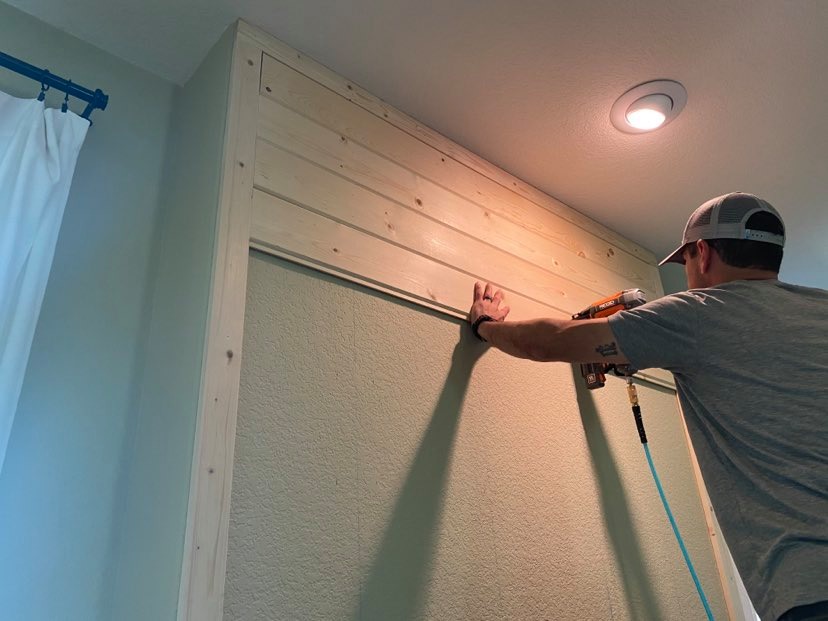
We've been in this house 6 months and we haven't gotten around to painting the walls yet. I'm not a fan of the beigy/taupe color. I think it really hurt the look of this fireplace with white on the bottom and brown on top. It took a few days, but I talked the husband into putting a wall of shiplap above the fireplace! If you'd like to do something similar, rest assured this was only about a half day project. We went to home depot and bought five 1" x 6" x 12' Barn Wood Shiplap Pine Boards for $8 each ($40 total) and two 1" x 2" x 12' pieces of trim for the frame ($8). My husband cut all the pieces to the width of the fireplace wall. Then, he used his laser stud finder and line chalk to mark where the studs are (very important and helpful step when securing the boards!). Starting with the outside frame, he applied construction adhesive before putting them in place on the wall and using his air compressor and nail gun to secure to the wall. We filled the nail holes with wood filler and sanded lightly.
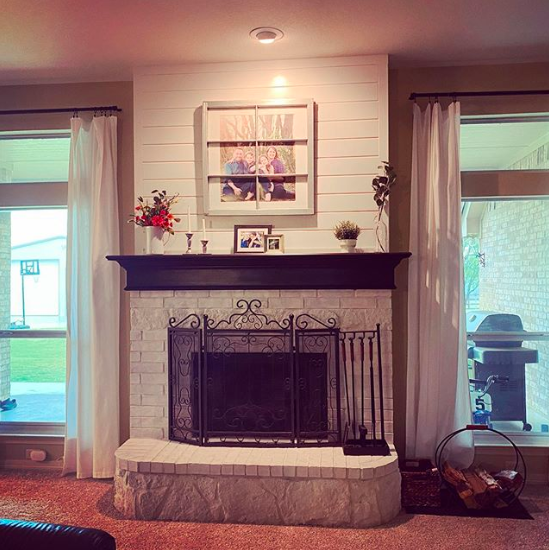
Now we're getting somewhere... 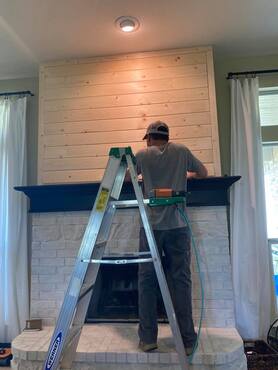 The very last and easiest step was to paint the shiplap in the same white as the fireplace brick and kitchen cabinets (not the whitewashed mixture with mineral spirits, but solid Benjamin Moore Chantilly Lace OC-65). I let it all dry and cure for a few days before styling it and... pure statement piece wonder!!!!  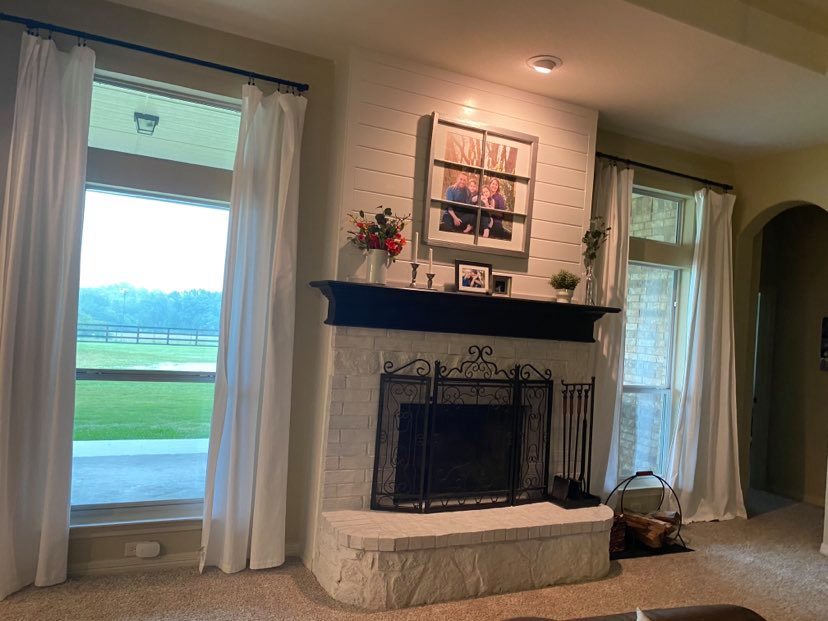 When you enter our house, the fireplace is in direct line of sight. I'm thrilled with the resulting grandeur and sophistication this brings to the living room and our entryway.
INGREDIENTS
DIRECTIONS
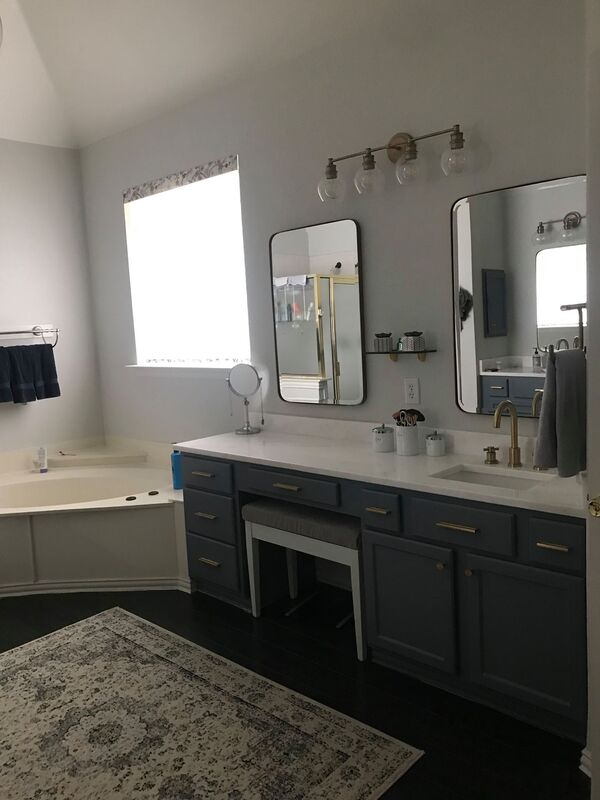
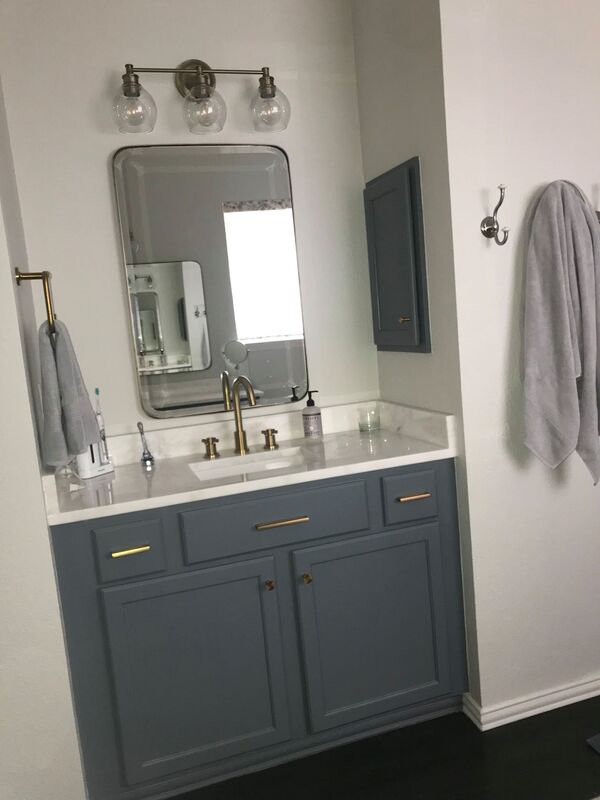
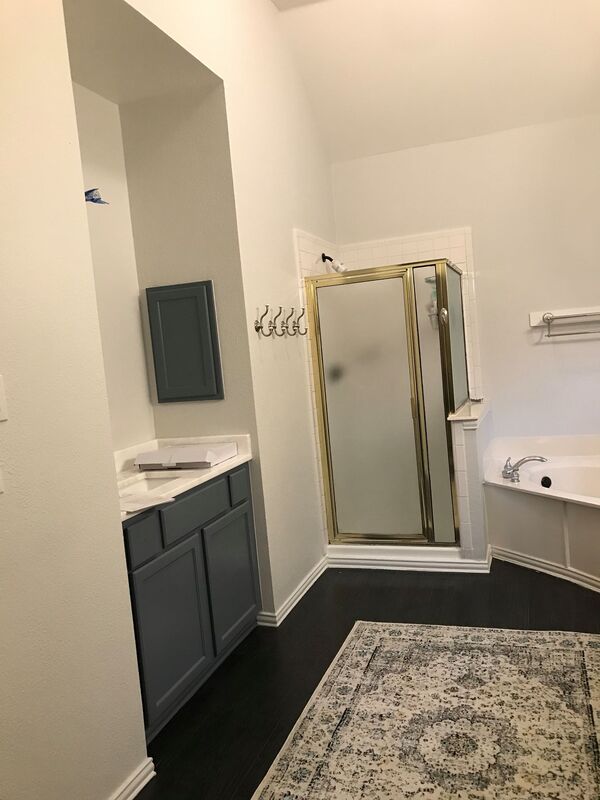
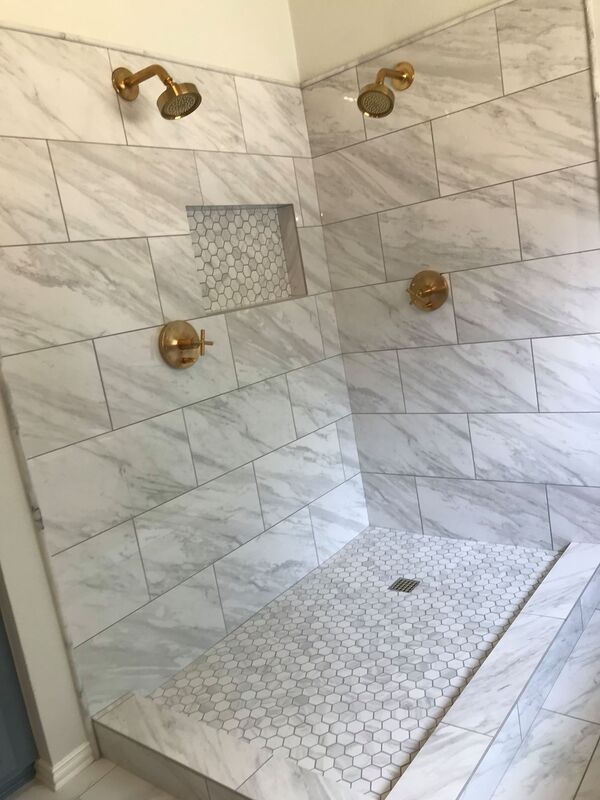
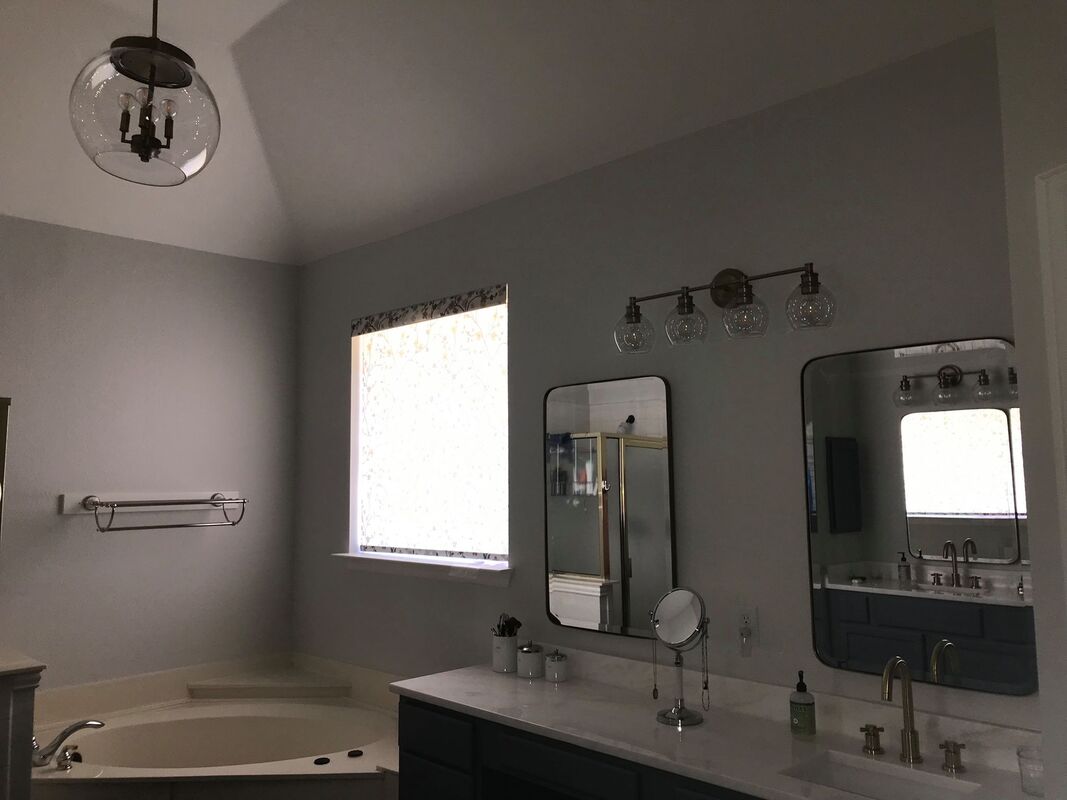
Our master bathroom was an eye sore that I couldn't stand for years. The flooring was faux wood panels in ebony that had a ton of bubbles and one area where they weren't feathered in, but in a straight line. The builder grade 1990's light fixtures and mirrors were bad... just bad. Oh, and look closely you'll see sea- shell shaped sinks. The white paint had yellowed as had the counter tops (not to mention several curling iron burns). The shower was tiny and the tub spray black flecks every time you ran it. Ohhh yeah... and the oil rubbed bronze shower and fixtures? They used to be 90's brassy brass and the previous owner spray painted them. Which, on fixtures that you move & touch, does not work. There was paint flecks falling off every fixture in that bathroom (the floor was constantly covered in paint flecks, daily). Here's the "BEFORE" pictures: 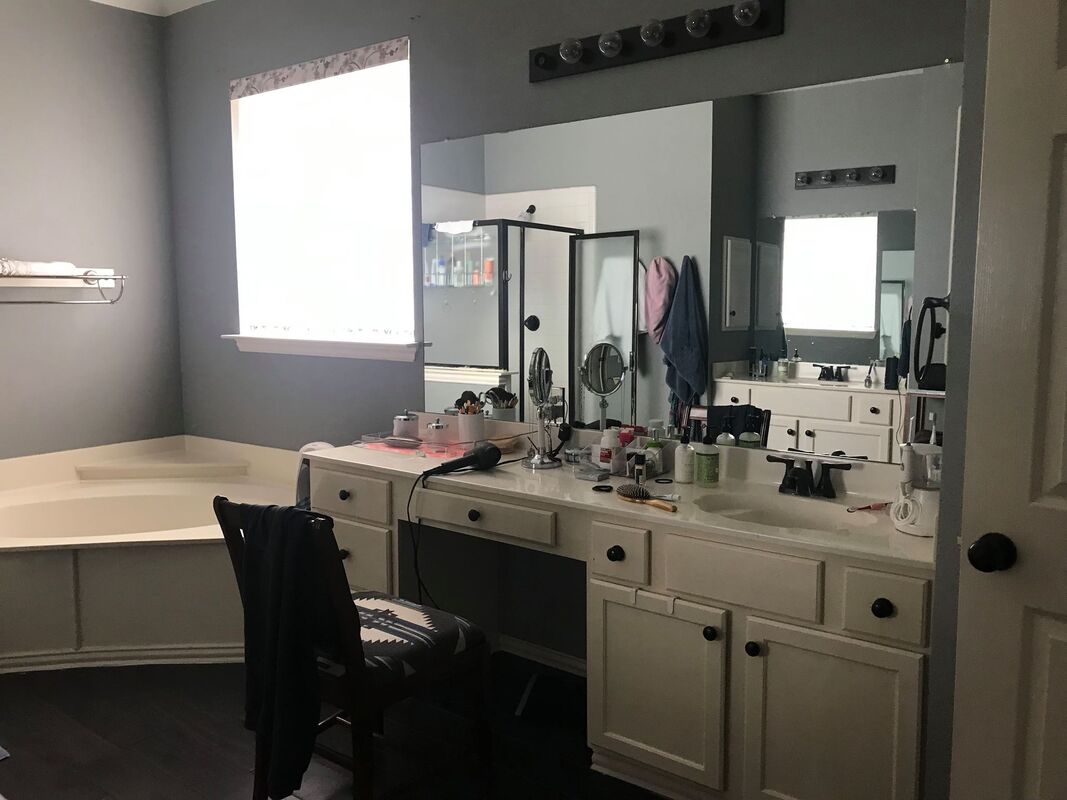 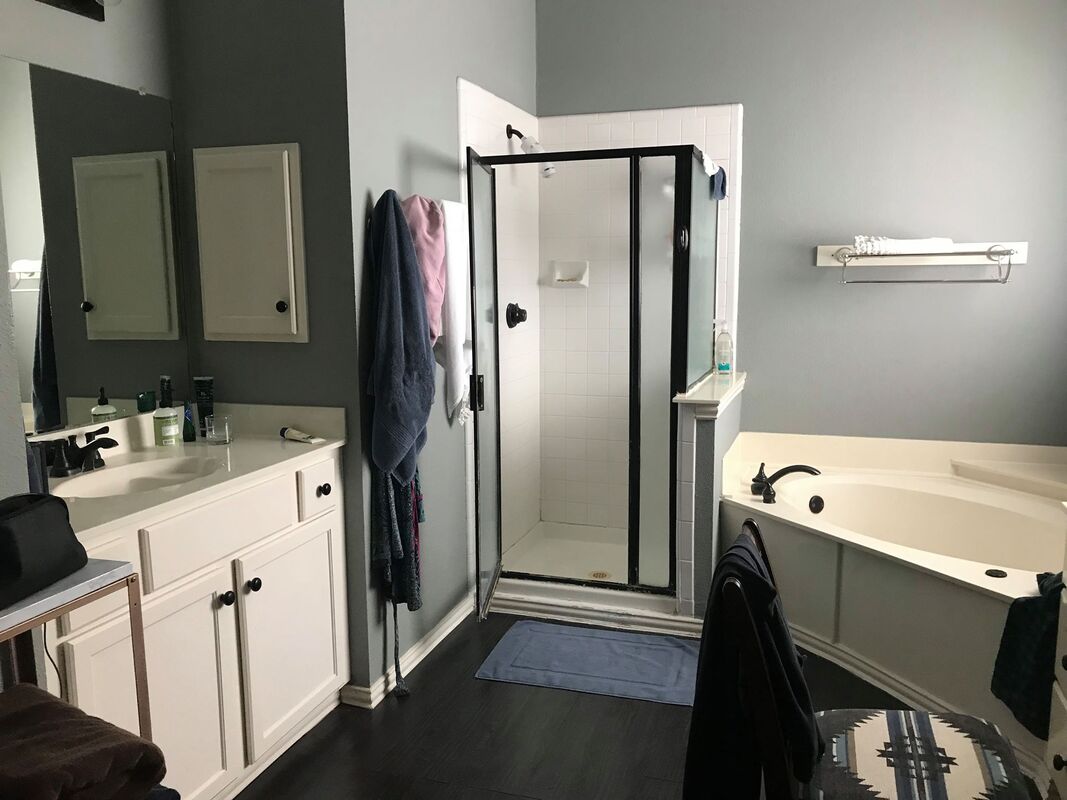 I finally convinced the husband to start updating with me in a phased approach so we could pay for it out of pocket as we go. As a rule, we do not like to take out loans or use credit cards if at all possible. Phase 1:
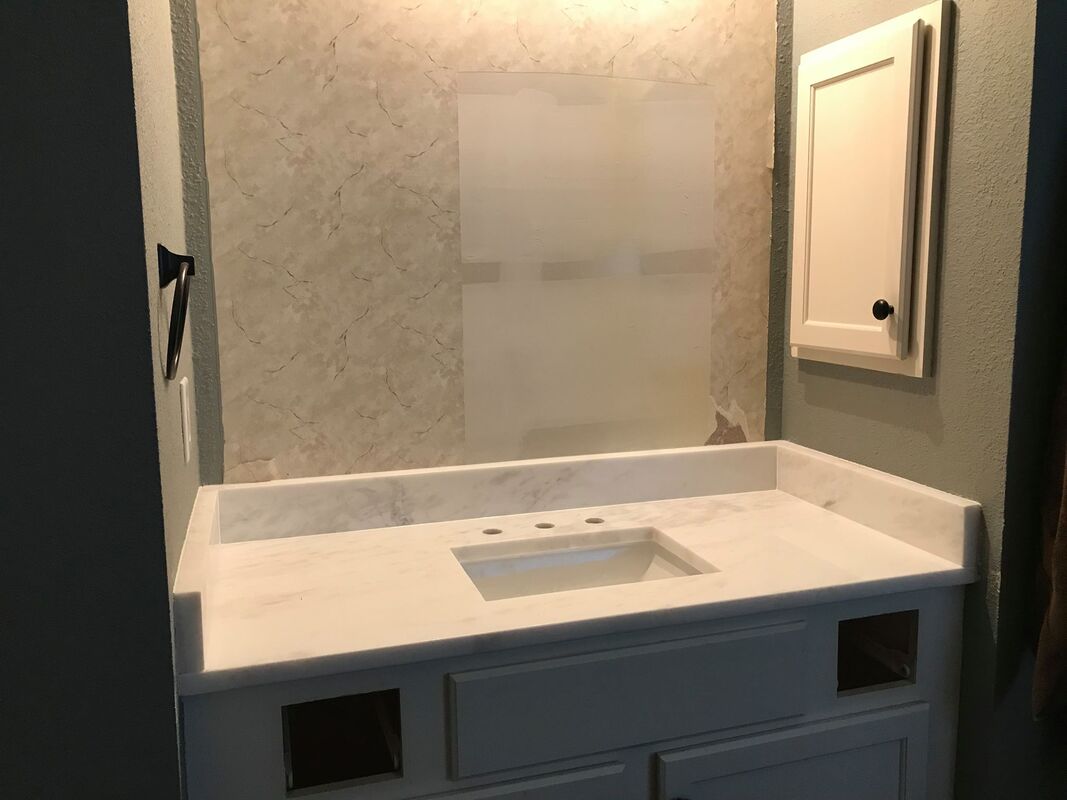 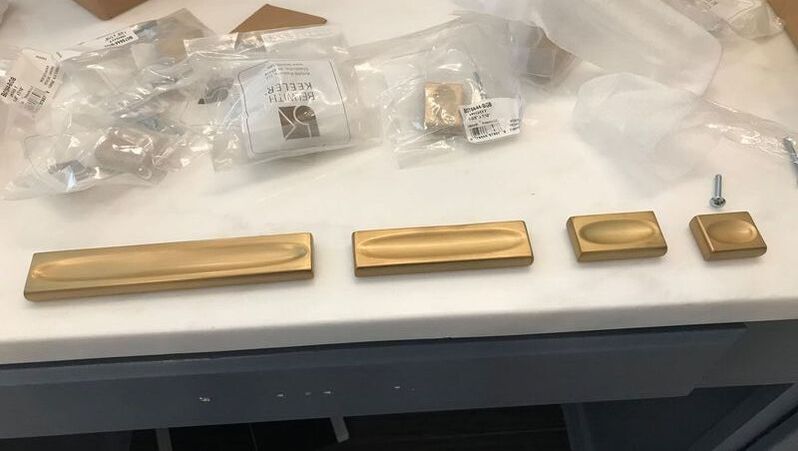
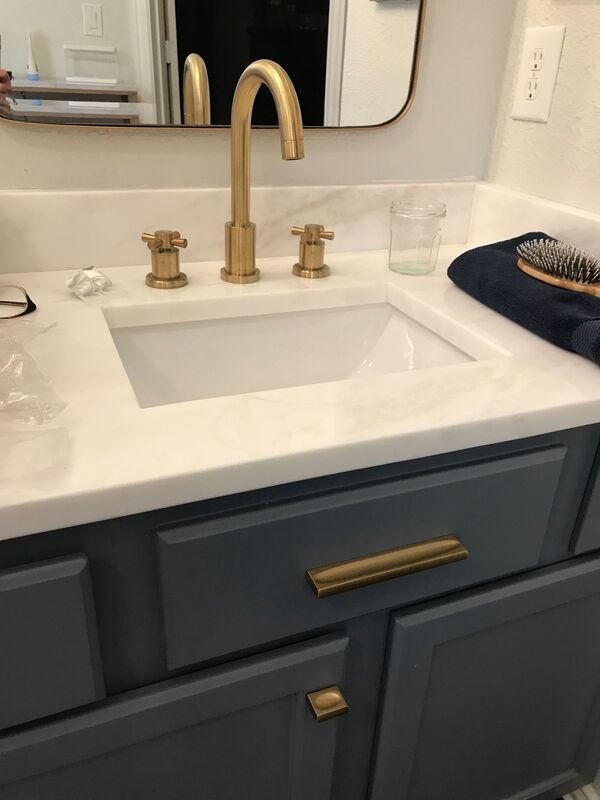
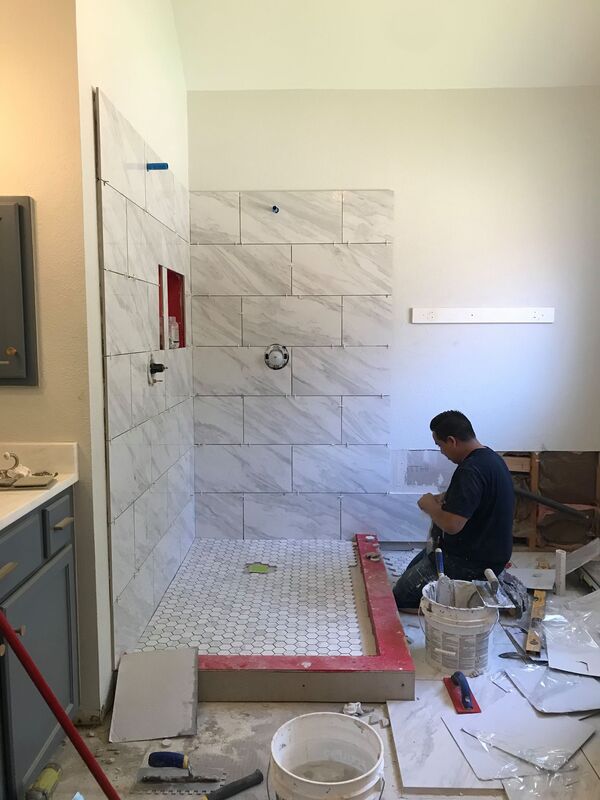
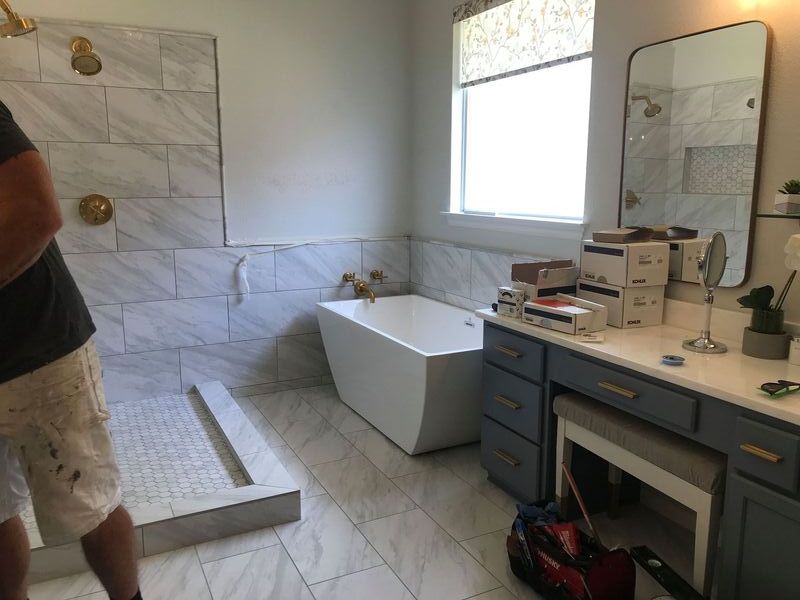
Phase 2 (2 months later): Done by our amazing contractors Priess Remodeling
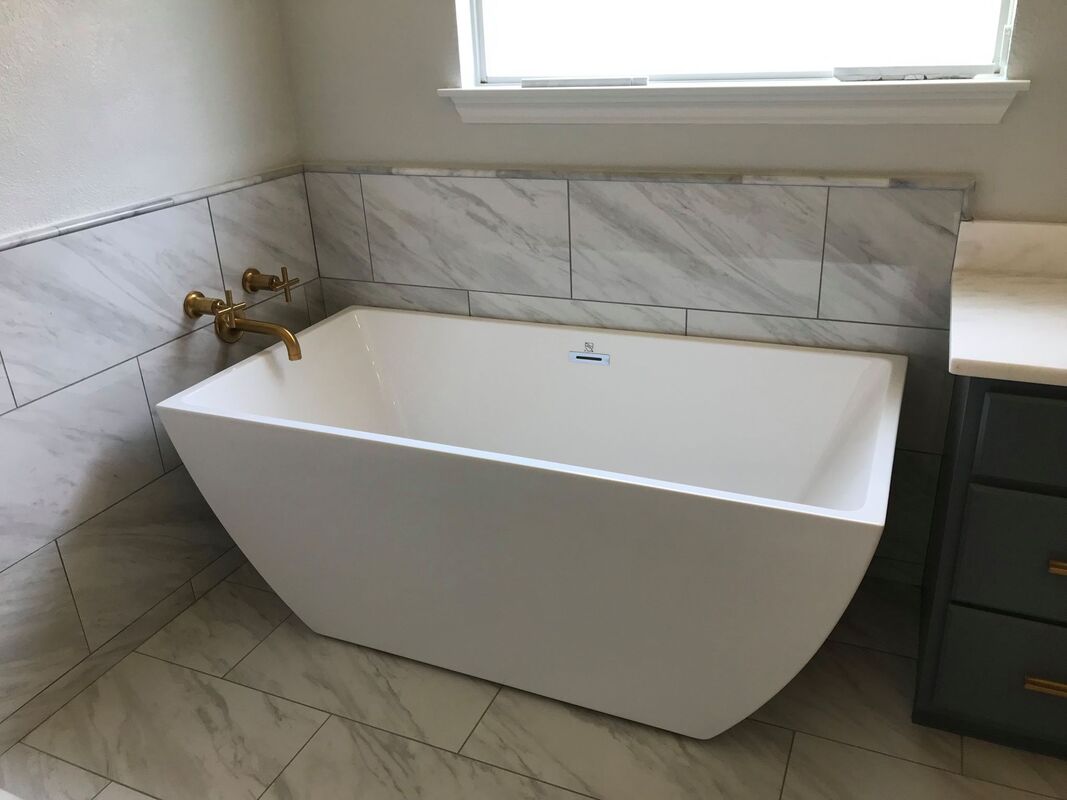
 And the final reveal.... 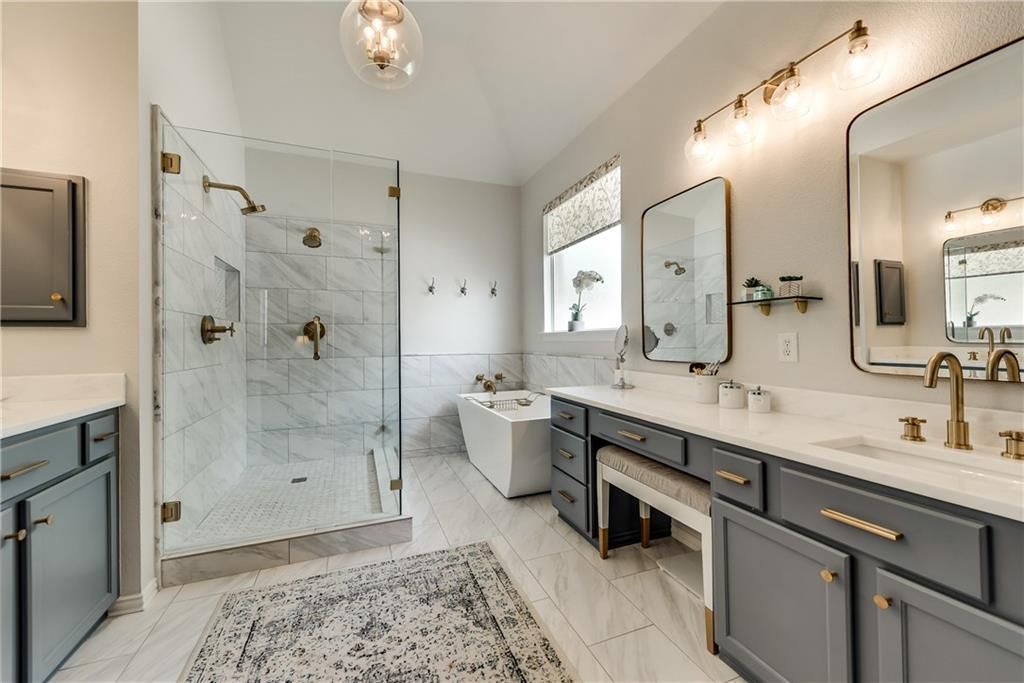 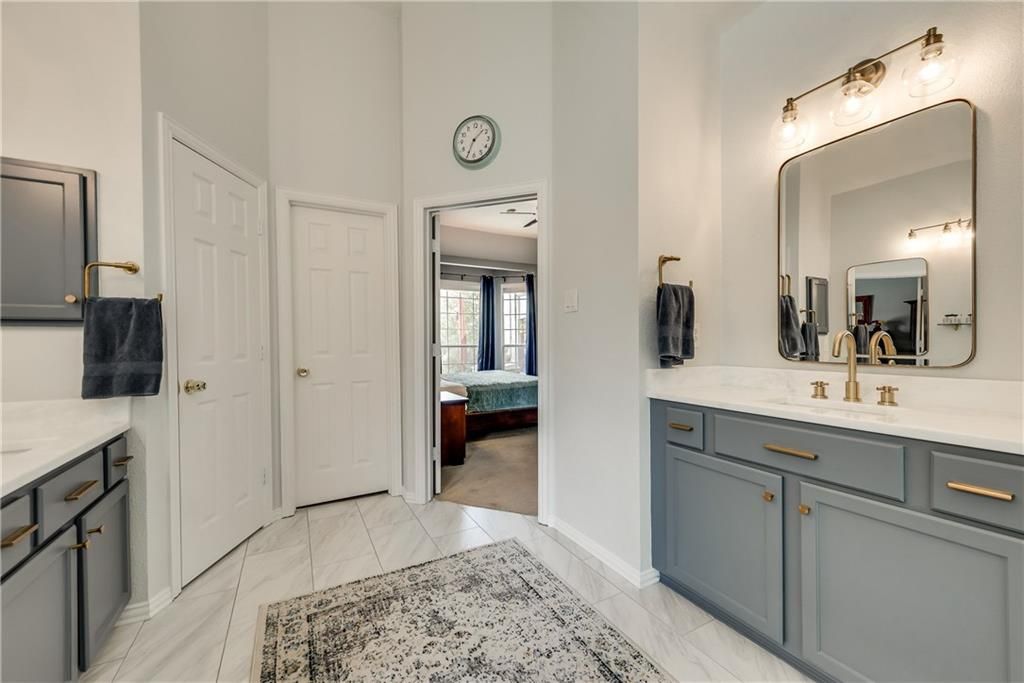 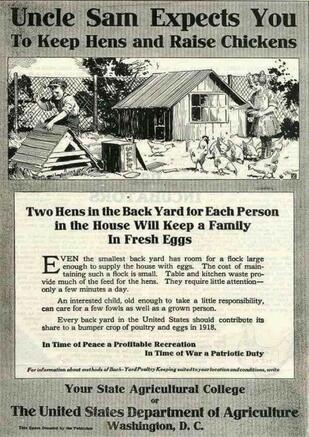 A Micro-History Lesson To Better Prepare for the Future
I'm not a doomsday prepper or anything, but I'd feel less anxiety about this coronavirus epidemic if I were confident my family was food-secure and self-sufficient. The initial food shortages we're seeing make me look back at other times in U.S. history when we've faced food scarcity and how we handled it. You know the old saying "Those who do not learn history are doomed to repeat it." I like to look at similar situations in the past to help plan for the future.,, During World War I (WWI), America’s troops and their allies in Europe were facing starvation- Most of their farmers had enlisted in the war, leaving their farms to languish or be turned into battlefields. To meet the need for food overseas, the U.S. urged its citizens to reduce their personal consumption of meat, wheat, fats and sugar. Slogans such as “Food will win the war” compelled people to avoid wasting precious groceries and to eat more fruits and vegetables, which couldn't be transported overseas. Likewise, promotions such as “Meatless Tuesdays” and “Wheatless Wednesdays” implored Americans to modify their eating habits in order to increase shipments to the soldiers. The U.S. also urged them to keep hens & raise chickens. As a result, food shipments to Europe were doubled within a year, while consumption in America was reduced 15 percent. During World War II (WWII), it became apparent that voluntary conservation on the home front wasn't enough. The U.S. set price limits and issued food ration books in order to discourage hoarding and ensure equitable distribution. Americans couldn't purchase sugar, coffee, meats, cheese, fats, canned fish, canned milk and other processed foods without food ration stamps. It's reasonable to imagine if this pandemic continues to grow and our world spirals, food shortages could worsen and rationing may become necessary. I'd rather be prepared and start increasing my self-sufficiency now before that happens. There's no negative to growing your own fruits & vegetables and canning some of them. Start bee-keeping for the honey or collect sap from your maple trees to make maple syrup and trade for other goods with neighbors. Raise your own backyard chickens and be sure of eggs/meat. We should learn from the past to help us better prepare for a potentially significantly different future. Up until now, our "homesteading" lifestyle of self-sufficiency has been just a fun hobby... but it could quickly become a real necessity and the new normal. *Source: History.com With the coronavirus changing life so drastically, I've found that our homesteading ways have really helped with weathering this storm. My penchant for cooking foods from scratch and resourcefulness has become a lot more essential. I've made a list of the times I've felt fairly well prepared for self-isolation and reduced food security:
Homesteading Fails that I'm seriously regretting!
Worried about food shortages and preparing for the new-normal? Learn from the past to prepare for the future! Read my newest blog post Food Shortages and Rationing. Warning: Once you make alfredo sauce from scratch, it's pretty much impossible to go back to jarred alfredo sauce ever again. This is what alfredo sauce is supposed to taste like. #LifeChanging I've got two versions that I make, depending on what I've got in the fridge. The first version "Alfredo Cream Sauce" is faster and very rich. ALFREDO CREAM SAUCE INGREDIENTS
ALFREDO CREAM SAUCE DIRECTIONS
VERSION 2 VERSION 2 VERSION 2 VERSION 2 VERSION 2 VERSION GARLIC ALFREDO SAUCE INGREDIENTS
GARLIC ALFREDO SAUCE DIRECTIONS
I like to make a roast chicken (it's so cheap and easy!!) and make a big batch of chicken bone broth (aka chicken stock) from the leftover skin & bones. Those times when I'm short on time and I pick up a rotisserie chicken instead, I still make sure to use the leftover skin & bones to make my bone broth. It extends your dollar so much further. Waste not, want not and all that.
Basically every ingredient listed below is optional besides the chicken itself and the water obviously. There's really no going wrong. INGREDIENTS
DIRECTIONS
|