Urban Family Homesteader
  • Recipes
  • DIY Projects
  • Going Solar
  • Backyard Chickens

Urban family homesteader

Picture

Stencil Tile for Pennies on the Dollar Compared to a Renovation

10/28/2019

3 Comments

 
I'm right-brained and my visual surroundings tend to have a strong influence on my mood/emotions.  Our fireplace and the tile area in front of our patio door would just hurt my eyes to look at them, They were this ugly orangish builder-grade tile. I thought about replacing the tile entirely but we've got a mile-long list of updates, repairs and renovations that we want to make to our house that total something like $100K... That basically means we have to prioritize our projects and find ways to do some of them inexpensively. 

When I found a handful of pins on Pinterest that showed how easy it was to stencil & paint tiles instead (for 1% of the cost), I had to try it! I felt pretty confident I could tackle this project on my own after stenciling my laundry room wall pretty well. So I searched through the stencils at cuttingedgestencils.com and found the perfect one, the Amalfi stencil. I emailed their customer service and requested custom sized stencils made-- 11 3/4” square for the fireplace and 17 3/4” square for the patio entryway. They cost a cool $38. Rust-oleum's chalk paint is a bit pricey and I needed to buy most the materials new. In total it cost $250 which is basically nothing compared to removing/replacing tile!!

Shout out to Cutting Edge Stencils- they have fantastic tutorial videos that painstakingly illustrate how to use the stencils. I watched a few and felt entirely prepared to get started. One easy weekend project later, I declare our newly painted tiles to be beautiful and a total Pinterest WIN!  
 
If you’re considering this for your home, all I can say is don’t be intimidated. It's a shockingly easy project to tackle. This one was more about being fastidious and following the steps closely. I’ll skip to the chase and start out with the before/after photos—the best part of any blog!! 😊 See the project steps/instructions just below the photos:
Picture
Picture
Picture
Picture
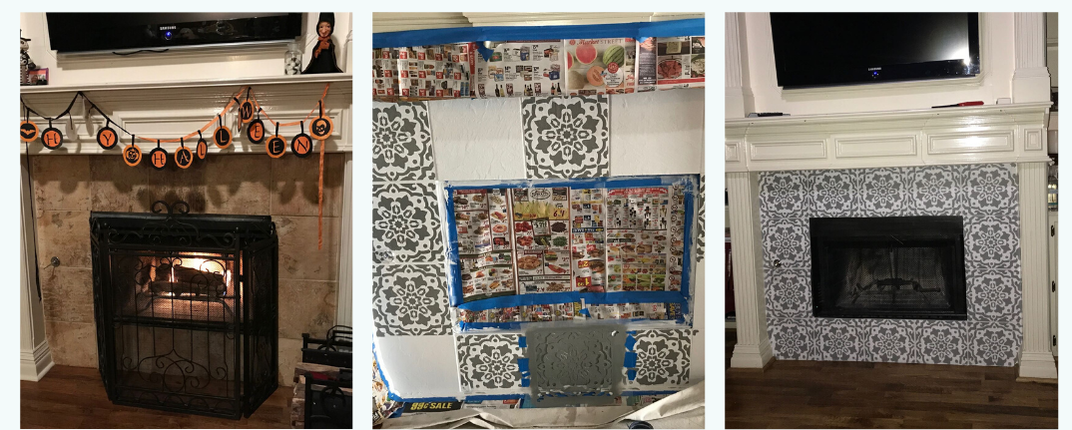
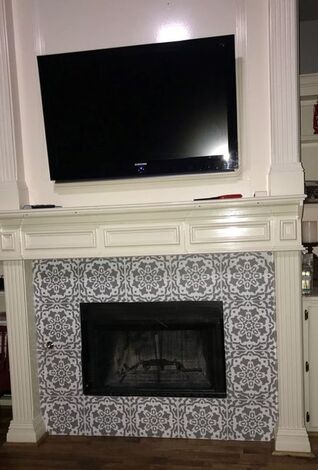
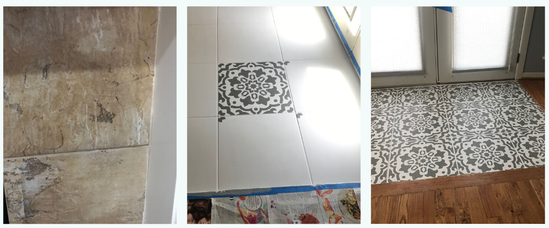
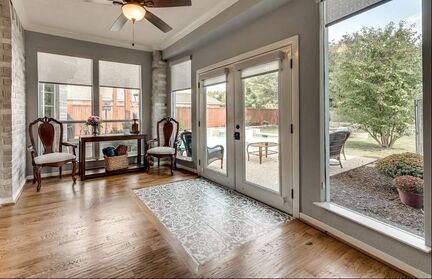
​HOW I PAINTED MY UGLY BUILDER GRADE TILE FLOORS:  
  1. STEP ONE: Sand the tile with a palm sander- this roughens it up so the paint will adhere best. (Time: 10-15 minutes)
  2. Clean it thoroughly with a de-greaser- I used Rust-Oleum’s Cleaner and Degreaser. Follow the instructions on the bottle and then give it at least 2 hours to ensure it’s totally dried. (Time 15 minutes)
  3. Now, tape off everything you don’t want painted using blue painter’s tape. I used some magazines & newspapers too, because I’m a really messy painter despite the many years of painting I did in the Navy. (Time: 30 minutes)
  4. I started painting using a medium sized paint bush and the primary color of Rust-Oleum’s country gray chalk paint; starting with the grout lines first. (Time: 10 minutes)
  5. Next, I painted the face of the tiles with the same country gray chalk paint using a 4” dense foam roller. (Time: 15 minutes)
  6. Wait for it to dry – I gave it about an hour… but with chalk paint it dries really quickly and I probably could’ve started the second coat within ~30 minutes. (Time: 1 hour)
  7. Paint the tiles in its primary color a second time (Time: 15 minutes)
  8. Wait for it to dry again- I ran some errands and gave it probably a half day out of caution (Time: 4 hours)
  9. Next is the more intimating part—but don’t be scared… it’s not that bad! I laid down the stencil one tile at a time and rolled on the secondary color of Rust-Oleum’s Linen White chalk paint. I rolled the roller brush in the paint tray lightly and then rolled off excess paint on a paper plate with paper towels on it (SUPER IMPORTANT! If the roller is too saturated it will bleed under the stencil). I taped the stencil down using blue painters’ tape. Some bloggers recommended using spray adhesive- I tried that, but it didn’t seem to make it tacky. It was probably user error—but the blue painter’s tape was simple and fool-proof- that's what I'd recommend.
  10. Be sure to wipe off the back of the stencil between every single tile so there wouldn’t be any smudges. It’s probably common sense, but you stagger the tiles you’re working on so you’re not taping the stencil down on a freshly stenciled/wet tile. The paint dries so fast, I didn’t have to pause at any time. I started with the tiles that were full-size. Any that were irregular, I saved for last since they were a little trickier. I came up with my own “hack” on how to stencil partial/irregular shaped tiles by holding the stencil down and using a pencil to finish tracing the design in the cracks/corners and then painting it in by hand. Some bloggers recommended cutting the stencil, but I was certain I’d screw that up and later need the full stencil in tact. Taping/penciling the pattern in cracks/corners worked very easily/cleanly! (2 1/2 hours)
  11. I took a short break, maybe an hour or so and then cleaned up any smudges or wavy lines by hand. I was being really careful and detailed, so I probably took about an hour doing that. It made a huge difference and I highly recommend you don’t skip this step.
  12. I waited over night to let it dry thoroughly before sealing with Rust-Oleum’s Clear Concrete and Floor Finish/Sealant. Since the patio is right off the pool and the tiles were previously dangerously slippery when wet, I wanted to fix that issue so I added Rust-Oleum’s Anti-Skid Additive. Be sure to follow the package instructions. Once the sealant dried on the tiles, I was a bit worried because it was super gritty feeling – which didn’t feel great on bare feet. However, within a day or two of traffic it had softened to a perfect non-slip texture—so no worries! The sealant instructions recommended only one layer of sealant. Since that required less work than the multiple layers of sealant most other blogs seemed to recommend, I followed the instructions and it’s been perfectly durable.
 
It’s been 5 months since I painted the tile and it still looks brand new. I’m confident it will hold up for years. They’re a serious statement look. I can’t help telling people I painted them and they’re always blown away. The contractor who renovated our bathroom couldn’t believe it. He took pictures to share with another client who’d just been talking about painting their existing tile.
 
The best part? This cost is about 1% of what tearing the tile out and replacing it with new flooring would’ve cost! This project only cost $250!!!
*Disclosure: This post contains affiliate links, meaning that I get a commission if you decide to make a purchase through my links, at no cost to you.
  • Palm Sander
  • 17" Amalfi Stencil for my floor tiles from Cutting Edge Stencil
  • 11" Amalfi Stencil for my fireplace surround from Cutting Edge Stencil
  • Dense foam 4" roller
  • Pack of 4" replacement rollers
  • Stenciling brush kit
  • Rust-Oleum 285141 Ultra Matte Interior Chalked Paint 30 oz, Country Gray (qty. 4)
  • Rust-Oleum 285141 Ultra Matte Interior Chalked Paint 30 oz, Linen White (qty. 4)
  • Rust-Oleum Anti-Skid Additive
  • Rust-Oleum Clear Concrete and Floor Finish/Sealant
 
We’re in the process of buying a new house now which has too much tile for my taste, but we don’t have the budget to pull it out. So, I definitely see a lot more tile painting in my future. I’ll add pictures from that project in this blog too so you can see more examples. Thanks for following this blog and please comment with questions or feedback and share with friends!!

3 Comments
Christi
3/6/2020 09:23:18 am

I've got the same tile in our entryway and I've always hated it. Thank you for the tip!

Reply
Jill
4/1/2020 10:52:27 am

OMG Yes!

Reply
Annabel
6/1/2020 10:28:05 pm

I’ve heard about this, but this is the best tutorial I’ve found. Makes it feel approachable. I think I’ve worked up the courage to try this in my master bath. Thanks!

Reply


Leave a Reply.

    Homesteaders

    Cooking & home projects galore! My secret inner-designer revealed.

    Categories

    All
    Backyard Chickens
    Blog
    Casita
    Christmas
    DIY Projects
    Going Solar
    Halloween
    Holidays
    Ikea Hack
    Recipes
    Thanksgiving

    Archives

    July 2024
    August 2020
    May 2020
    April 2020
    March 2020
    February 2020
    January 2020
    December 2019
    November 2019
    October 2019
    September 2019
    August 2019
    July 2019
    June 2019
    May 2019
    April 2019
    March 2019
    February 2019
    January 2019
    December 2018
    November 2018
    October 2018
    September 2018
    August 2018
    July 2018
    June 2018
    May 2018
    April 2018
    March 2018
    February 2018
    December 2017
    November 2017
    October 2017
    September 2017
    August 2017
    July 2017
    April 2017
    December 2016
    October 2016
    September 2016
    August 2016

Contact Us

Submit
  • Recipes
  • DIY Projects
  • Going Solar
  • Backyard Chickens